Ever been cruising down the highway when suddenly, a sharp clicking sound starts emanating from your dashboard? It’s enough to make you slam on the brakes, heart pounding, wondering if your car is about to give out. I remember the first time I heard that noise—I was sure it was a sign of major engine trouble, but it turned out to be something entirely different. That moment was a lightbulb for me: weird noises aren’t always catastrophic, but ignoring them can lead to bigger problems. Today, I want to share my experience and help you understand what that clicking could really mean—specifically, a faulty blend door actuator. We’ll go through how to diagnose it, and I’ll walk you step-by-step on fixing the issue, so you can get back on the road with confidence.
Recognizing the Noise That Could Save Your Comfort (and Your Wallet)
The dashboard is like your car’s nerve center, quietly giving us signals about what’s happening underneath. When the blend door actuator fails, it often produces a distinctive clicking noise, especially when you change the temperature settings inside your vehicle. It might seem like a mere annoyance—something to ignore—until you realize the implications. If left unchecked, that malfunction can prevent proper air distribution, leaving you sweating in the summer or shivering in winter, all while ignoring the root cause. I made the mistake early on of dismissing such noises, assuming they were simple squeaks or HVAC quirks. But ignoring that tiny click could have led me to bigger issues, like heater core failure or AC problems, both costly to repair. This is why paying attention to seemingly minor signals saves money and hassle in the long run. In fact, automotive experts suggest that early diagnosis of such issues can prevent more extensive damage and expense, preventing the problem from snowballing into something more serious. And trust me, it’s easier to fix a dud actuator than to replace your entire dashboard or HVAC system. If you’ve experienced a similar problem, or if your air doesn’t correct to your preferred temperature anymore, you’re not alone. Let’s dive into how to diagnose whether that click is your faulty blend door actuator and what to do next.
Is Replacing the Blend Door Actuator Really Worth the Trouble?
Many drivers hesitate at the thought of diving into HVAC repairs or the possible costs involved. I get it—the idea of tinkering with hidden parts inside the dashboard can be intimidating. I once tried to fix a similar issue based on some online tips, only to realize I had bought a fake part that almost made things worse. That mistake taught me the importance of knowing exactly what’s happening before jumping into a repair. For more insights on identifying genuine parts, check out this guide on [spotting fake OEM parts](https://repairmycarpro.com/how-to-spot-a-fake-oem-part-before-you-install-it). Getting the correct part and understanding the process can save you time, money, and frustration. So, is replacing your blend door actuator worth the effort? Absolutely—if it means restoring comfort and preventing future complications, then yes. But the key is knowing how to identify the problem precisely. Up next, I’ll walk you through some practical diagnostic steps so you can pinpoint the cause before you hit the shop or get your hands dirty.
Get Hands-On with Your Vehicle Diagnostics
To effectively identify if your blend door actuator is the culprit, start by turning on your ignition without starting the engine. Set your heater or A/C to different temperatures while listening carefully for that characteristic clicking noise. If you hear it only when adjusting the temperature, it reinforces the suspicion. Remember, this noise often occurs when the actuator struggles to move the blend door, and consistent clicking is a key sign. Next, engage the climate controls repeatedly to see if the noise varies; consistency is your friend here. When I faced this issue myself, I was momentarily frustrated, but by paying attention to the noise pattern, I could confirm the faulty part before diving into repairs. Now, with some basic knowledge, let’s move on to physical inspection.
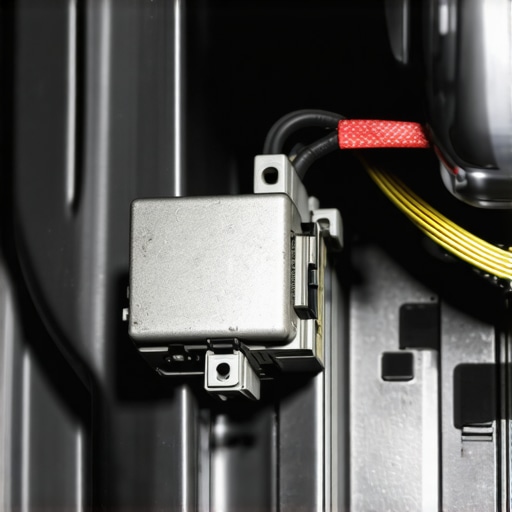
Access and Inspect the Blend Door Actuator
Typically, the blend door actuator is positioned behind the dashboard on the HVAC assembly. To reach it, you’ll need to disconnect the vehicle’s battery first—think of it as disconnecting the negative terminal to avoid any electrical shocks, similar to turning off a power strip before working on electronics. Once the dashboard panels are removed carefully (using trim removal tools to prevent damage), locate the actuator, which looks like a small box with electrical connectors and a few mounting bolts. Use a flashlight to inspect for loose connectors or obvious damage. During my initial attempt, I found a loose wiring harness, which I reconnected. However, if the wiring looks intact, proceed to test the actuator itself.
Test the Actuator Before Replacing
Applying power directly to the actuator can reveal if it’s functional. Using a 12V power source, connect the terminals—carefully, to avoid shorts—and observe if the motor turns smoothly. If it doesn’t move or stutters, the actuator is likely faulty. Alternatively, you can disconnect the electrical connector and test the continuity with a multimeter. A consistent reading indicates the motor coil inside is healthy; irregular readings suggest failure. Remember, testing like this is akin to checking a motorized window by supplying direct power—simple but effective. When I did this test, I discovered the motor was dead, confirming I needed a replacement.
Replacing the Blend Door Actuator Effectively
To swap the faulty part, remove the mounting screws securing the actuator and disconnect the electrical plug. Remember to keep track of tiny screws and components—using a magnetic tray can help. Next, attach the new actuator, ensuring it’s aligned correctly with the blend door linkage. Tighten the screws securely but avoid overtightening, which could damage the plastic parts. Reconnect the electrical connector, then test the new part by turning on your vehicle’s climate control system. Set different temperatures and listen for movement; no clicking and smooth operation mean success. Finally, reassemble the dashboard panels carefully, reconnect the battery, and perform a test drive. Paying close attention during your first drive will reveal if the air distribution issues are resolved. Keep in mind, buying OEM parts through [how to spot a fake OEM part](https://repairmycarpro.com/how-to-spot-a-fake-oem-part-before-you-install-it) ensures longevity and proper fit. Practicing these steps not only saves money but also boosts your confidence in vehicle maintenance.Many car owners believe they understand the basics of maintenance, but beneath those assumptions lie nuanced pitfalls and misconceptions. One prevalent myth is that changing your oil every 3,000 miles is universally necessary; in reality, modern synthetic oils and vehicle advancements allow for longer intervals, as supported by recent automotive research. However, many still follow outdated schedules, risking unnecessary costs or overlooked issues. An often-overlooked mistake involves neglecting the importance of vehicle diagnostics beyond basic checks—advanced diagnostic tools can reveal hidden issues like early sensor failures or subtle engine imbalances before they escalate. For example, misdiagnosing brake issues as simple brake pad wear can lead to overlooking underlying problems like warped rotors or caliper malfunctions, which, if left unchecked, might cause dangerous braking performance. Many assume that brake squeal always indicates worn pads, but it could also stem from debris lodged in the caliper or uneven rotor surfaces. As experts emphasize, understanding each component’s function and common failure modes enhances diagnosis accuracy and repair longevity. Have you ever fallen into this trap? Let me know in the comments.
Why Do Many Overlook Subtle Diagnostic Cues in Vehicle Troubles?
A secret to smarter vehicle maintenance lies in recognizing early warning signs—like slight noises or minor performance dips—that most drivers dismiss. Ignoring these subtleties often results in costly repairs down the line. For instance, a faint engine misfire might seem trivial but could indicate worn injectors or failing sensors, issues that diagnostic scans can detect more precisely than mere intuition. Relying solely on visual inspection without diagnostic data can delay needed repairs or lead to replacing parts unnecessarily, increasing expenses. In fact, comprehensive diagnostics can identify underlying causes that aren’t immediately apparent, saving both time and money. This approach aligns with recommendations from industry experts who advocate for proactive, rather than reactive, maintenance strategies. Consider tools like OBD-II scanners or professional analysis—investments that pay off by preventing catastrophic failures. To dive deeper into advanced diagnostics, check out [why your engine light blinks when you try to accelerate](https://repairmycarpro.com/why-your-engine-light-blinks-when-you-try-to-accelerate). By integrating these insights, you can maintain optimal vehicle health and avoid common pitfalls.Maintaining your vehicle’s optimal performance over time requires using the right tools and establishing effective maintenance routines. A high-quality OBD-II scanner, such as the BlueDriver or the Autel MaxiScan, becomes invaluable for quick diagnostics and identifying underlying issues early—saving you time and money. I personally rely on the BlueDriver because it offers comprehensive codes and live data readings, allowing me to detect problems like faulty sensors or engine misfires before they escalate. Regularly updating your diagnostic software ensures compatibility with new vehicle models and keeps you ahead of emerging issues.
For routine maintenance like oil changes, I prefer a digital oil life monitor integrated into my vehicle’s ECU, which provides precise intervals based on driving conditions rather than generic mileage estimates. This approach minimizes unnecessary oil changes while ensuring the engine stays well-lubricated. When it comes to brake service, quality equipment such as a brake caliper piston retractor and a brake bleeding kit are essentials—especially if you’re performing DIY repairs. I recommend the PowerStop brake caliper piston tool because it fits most models and makes retraction hassle-free.
Long-term success also hinges on using the right cleaning and inspection tools. A set of microfiber cloths and specialist cleaners, like CRC Brake Parts Cleaner, help keep components free of debris, extending their lifespan. Additionally, inspecting suspension components with a pry bar—like the one from Lisle—can reveal hidden wear before it becomes a safety issue. I’ve caught developing strut or ball joint problems early thanks to simple physical inspections combined with these tools.
Predicting the future of vehicle maintenance, I foresee an increased reliance on advanced diagnostics, perhaps integrating Bluetooth-enabled tools with AI-driven recommendations. These innovations will democratize vehicle care, empowering owners to maintain their cars more proactively, much like the shift towards smarter home automation.
For ongoing health checkups, incorporating methods like checking for parasitic battery drains with a multimeter—something I do every few months—helps prevent unexpected failures. Remember, consistency is key: establishing a preventive maintenance schedule tailored to your vehicle’s needs preserves its long-term reliability.
How do I maintain vehicle diagnostics over time? Regularly updating your diagnostic tools and cross-referencing data with manufacturer-specific service bulletins keeps you informed about your vehicle’s unique needs, ensuring you catch issues early. Consider integrating advanced testing techniques like the smoke machine method to detect vacuum leaks, which can cause idle issues and poor fuel economy. If you haven’t tried this yet, I recommend giving it a shot—it’s a game-changer for pinpointing elusive problems.
By investing in quality equipment and adopting a proactive maintenance approach, you not only extend your vehicle’s lifespan but also enhance safety and driving confidence. Keep your tools sharp, stay informed, and your car will reward you with years of reliable service.
The Hidden Truths I Discovered About Car Repairs and Diagnostics
- Never underestimate the power of listening closely to your car—those subtle clicks or vibrations often reveal more than a visual inspection ever could. Paying attention to these details has saved me from costly repairs and unnecessary parts replacements.
- Diving into the repair process taught me patience and precision. Rushing to fix a problem without thorough diagnosis can lead to wasted time and money—it’s better to understand exactly what’s wrong before acting.
- Investing in quality diagnostic tools was a game-changer. I realized that a good OBD-II scanner isn’t an expense but an essential companion for proactive vehicle maintenance, helping me catch issues early.
- Sharing experiences with other enthusiasts illuminated common pitfalls, like confusing symptoms or overlooking simple factors such as wiring connections. Community insights have boosted my confidence and competence in car care.
Tools and Resources That Elevated My Car Maintenance Game
- BlueDriver OBD-II Scanner: Reliable, easy-to-use, and capable of providing extensive diagnostics—it’s my go-to for quick and accurate vehicle trouble analysis.
- Automotive Service Workbook: This book demystified many repair procedures and clarified complex systems, empowering me to tackle more tasks myself.
- The article on engine light diagnostics: It helped me understand the importance of not ignoring warning lights and how to interpret their signals effectively.
- Guide to authentic parts: Knowing how to avoid counterfeit components saved me from future headaches and costly repairs.
The Drive Towards Confident Car Maintenance
Embarking on your own vehicle diagnostics journey might seem daunting at first, but trust me—taking proactive steps builds independence and peace of mind. Whether you’re addressing a mysterious clicking from the dashboard or analyzing complex engine behavior, the key is to stay curious, patient, and informed. Every fix you master enhances your understanding and ensures the longevity of your vehicle, turning mechanical mysteries into manageable challenges. Don’t wait for problems to escalate—start learning today, and enjoy the empowering feeling of keeping your car in top shape.
What aspect of vehicle diagnostics have you found most challenging or rewarding? Share your experiences below, and let’s learn together!
**