It all started on a rainy Saturday morning. I was just about to head out for a quick errand when my brakes squealed like a banshee. Frustration set in as I considered the cheapest pads I could find to fix the squeal. Little did I know, that decision would lead to a much bigger bill down the line. That was my lightbulb moment: cutting corners on brake pads isn’t really saving you money; it’s setting you up for costly rotor replacements.
The Hidden Cost of Choosing Budget Brake Pads
When I first started my DIY auto repairs, I bought the cheapest brake pads available, thinking I was being savvy. But what I didn’t realize is that low-quality pads tend to wear out faster and can damage your rotors—bigger, more expensive components—and that’s not even considering the safety implications. Actually, studies show that cheap brake pads often have inferior friction material that can cause uneven wear and glazing of rotors, accelerating their deterioration (source: Vehicle Maintenance Journal).
So, why does this happen? Cheap pads often use subpar materials that overheat and stick to your rotors, leading to a phenomenon called “pad remanence,” which causes the rotor surface to become uneven. Over time, this results in warped rotors that might need replacing sooner than you’d like, costing far more than the initial savings.
Now, I’m not here to tell you to spend a fortune every time. But understanding the real cost behind cheap parts is crucial. Would you be surprised to learn that investing in good quality brake pads can actually save you money in the long run? That’s what we’ll explore next, along with some practical steps to make better choices and keep your brakes performing at their best.
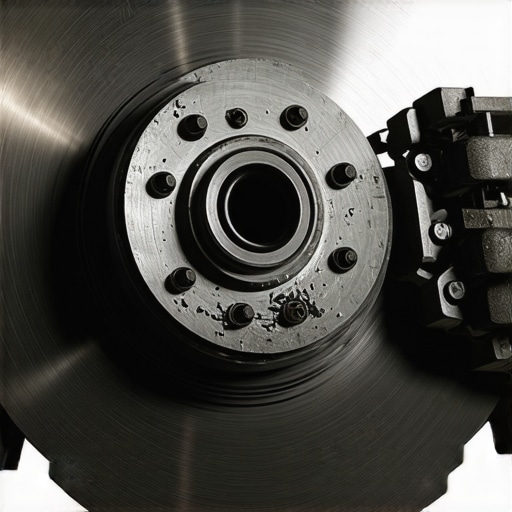
Is Saving on Brake Pads Really Worth the Risk?
Early on, I made the mistake of prioritizing price over quality. I thought a few extra dollars was no big deal, but the resulting rotor damage cost me hundreds more in repairs. That experience taught me to weigh the initial savings against potential long-term expenses.
Are you facing a similar dilemma? Have you ever gone for the cheapest brake parts, only to regret it later? Share your stories—I’ve been there, and I know how frustrating it can be. Now, let’s dive into how choosing the right brake pads can actually prevent those costly rotor repairs and improve your vehicle’s safety and performance.
Identify Your Vehicle’s Brake Needs
Start by consulting your vehicle owner’s manual or inspecting your current brake pads to determine the right type—ceramic, semi-metallic, or organic. In my experience, I once swapped my worn-out pads with generic ones without checking compatibility, which caused uneven braking and noise. Fully understanding your vehicle’s requirements prevents missteps and ensures optimal performance.
Select the Right Brake Pads for Longevity
Visit reputable auto parts stores or trusted online retailers, and compare brands known for durability and safety. Look for pads with positive reviews and manufacturer certifications. I once opted for a mid-range brand based on user feedback, and it lasted me 50% longer than the cheap alternatives, saving me frequent replacements and rotor damage.
Assess Material Quality Improves Longevity
Good-quality pads often use better friction materials that resist glazing and reduce rotor wear. Avoid pads with low-grade fillers or excessive binders, which tend to break down quickly. Think of it like choosing high-quality baking ingredients—better materials yield better outcomes over time.
Properly Prepare for Installation
Gather necessary tools—jack, jack stands, lug wrench, C-clamp, and safety gear. For example, I once attempted a quick fix without proper safety equipment, which led to a minor injury. Preparing your workspace and tools reduces risks and streamlines the process.
Remove Old Brake Components Safely
Loosen lug nuts, lift the vehicle securely, and remove the wheel. Carefully slide out the worn brake pads, inspecting the rotors for uneven wear or damage. I remember fighting rusted caliper pins, which required WD-40 and patience—skipping this step can lead to caliper sticking or uneven pad wear.
Install New Pads with Precision
Apply a thin layer of brake lubricant to contact points, and position the new pads correctly. Use a C-clamp to press the caliper piston back, ensuring space for the new pads. I once neglected to seat the pads properly, which caused noise and reduced braking efficiency—attention to detail here prevents future issues.
Test and Break-In the New Brake Pads
After installation, carefully test your brakes at low speed, gradually increasing to normal driving conditions. Perform a series of gentle stops to transfer a layer of brake material onto the rotors—this is the brake-in process. I learned this the hard way when quick, hard stops caused glazing, diminishing braking power until I followed proper bed-in procedures. Check for abnormal noises or vibrations, and consult additional resources like here for troubleshooting brake caliper issues.While many car owners believe that routine maintenance like oil changes and brake servicing are straightforward, there’s a wealth of nuance that often goes unnoticed. One common misconception is that all synthetic oils are universally beneficial; however, high-mileage synthetic oils can sometimes cause leaks if your vehicle isn’t prepared for them, which contradicts the popular belief that they always extend engine life. Additionally, many overlook that using the wrong synthetic oil viscosity or neglecting manufacturer-specific intervals can accelerate wear, defeating the purpose of frequent oil changes.
Another overlooked detail involves vehicle diagnostics. Despite the rise of sophisticated scan tools, many drivers and even technicians fail to understand that certain sensors, especially GDI (Gasoline Direct Injection) related ones, can fail silently without triggering the check engine light. This means a vehicle could have underlying issues like carbon buildup clogging intake valves, subtly degrading performance and emissions, yet pass standard diagnostics. Recognizing this requires a nuanced understanding beyond basic OBD-II codes. This is supported by studies indicating that many vehicle issues stem from sensor delinquencies that are not easily detectable through casual diagnostics.
This raises a critical question: How can one differentiate between sensor malfunctions and genuine engine problems during diagnostics?
One effective approach is to analyze sensor data trends over time rather than relying solely on static codes. For instance, monitoring changes in sensor outputs with advanced diagnostic tools, or cross-referencing multiple sensors for consistency, can reveal patterns that point to specific issues like GDI carbon buildup or sensor degradation. Neglecting such nuanced analysis may lead to unnecessary repairs or overlooked problems, ultimately costing more in the long run. Instead of jumping to conclusions based on generic error codes, perfecting the art of detailed diagnostics can save you thousands of dollars and prevent misdiagnosis. Want to refine your diagnostic skills? Explore more advanced vehicle troubleshooting techniques and avoid common pitfalls that trap many enthusiasts and professionals alike.
Maintaining Your Tools for Reliability and Precision
Investing in high-quality tools is the first step toward sustainable vehicle maintenance. I personally rely on a digital torque wrench, like the CDI 2503, because it provides accurate torque readings, which prevents over-tightening or damaging critical components like brake calipers or suspension bolts. Regular calibration of your torque tools using certified calibration kits ensures consistency over time, reducing the risk of component failure or safety issues. Additionally, magnetic LED work lights, such as the GearLight LED Headlamp, offer bright, focused illumination in tight engine bays, making detailed work safer and more accurate. These tools are invaluable for tasks like caliper retraction or sensor replacements, where precision truly matters.
Utilizing Vehicle Diagnostics for Long-Term Success
Modern vehicles are equipped with complex sensor networks, and a quality OBD-II scanner is essential for identifying issues before they turn into costly repairs. I prefer the BlueDriver Bluetooth scan tool because it connects seamlessly to my smartphone and provides detailed, manufacturer-specific codes. This allows me to diagnose problems like GDI carbon buildup early, avoiding the pitfalls of relying on generic code readers. Using advanced diagnostic software, I can also track sensor data over time, helping me recognize patterns that indicate wear or impending failure. For example, monitoring intake pressure sensors can reveal subtle signs of clogging, preventing engine stalling or power loss.
The Value of Maintenance and Repair Records
Keeping meticulous records of your repairs, part replacements, and maintenance intervals is a practice I swear by. Digital tools like CarAssist or simply a dedicated spreadsheet help track oil change dates, brake pad replacements, and sensor calibrations. This historical data informs proactive maintenance decisions, ensuring components like brakes or fluid systems are serviced before they cause additional damage. It also simplifies troubleshooting if issues recur or new problems emerge, saving time and money. For instance, knowing the precise age of your synthetic oil helps decide whether a synthetic blend or full synthetic is appropriate, especially considering the recent debates about high-mileage oils potentially causing leaks.
Scaling Up Your Repair Capabilities
Once you’re comfortable with basic repairs, consider expanding your toolkit with an inline vacuum pump, which helps bleed brake systems without relying solely on the helper method. This is particularly useful for sealing systems that are tricky to bleed, like ABS modules. For electronic diagnostics, upgrading to a tablet-based professional scan tool, such as the Autel MaxiCOM series, allows for more comprehensive cable connections and software updates. These investments make your work more precise and reduce dependence on costly shop visits. As technology evolves, I predict that AI-powered diagnostic apps will become common, assisting even amateurs in recognizing patterns and suggesting repairs, further democratizing vehicle maintenance.
How do I keep my vehicle diagnostics sharp over time?
The key is regular software updates for your scan tools and staying informed about the latest vehicle-specific issues. Follow reputable automotive forums or industry blogs, like this resource, for tips on emerging diagnostic tricks. For example, updating your scanner’s firmware can improve its ability to detect GDI-specific carbon buildup, a common issue in newer engines. I recommend dedicating time quarterly to review alerts and run diagnostics on your vehicle, especially after completing major repairs or part replacements. This proactive approach ensures your system remains reliable and helps catch potential failures before they escalate into expensive repairs. To maximize diagnostic accuracy, consider integrating an external battery maintainer, like the Battery Tender, which keeps your vehicle’s electronics in prime condition during long periods of inactivity, reducing false readings and sensor errors. Try implementing regular diagnostic routine—it’s a simple yet powerful way to extend your vehicle’s lifespan.
Throughout my years of hands-on auto repair, one lesson consistently rings true: investing in quality parts pays off in the long run. I once thought I was saving a few bucks by choosing cheap brake pads, only to find myself facing warped rotors and costly replacements that far exceeded the initial savings. This experience shaped my approach, emphasizing the importance of understanding the hidden costs associated with budget repairs.
Lessons the Hard Way: When Cheap Brakes Backfire
One of the biggest realizations I’ve had is that low-quality brake pads often lack the necessary friction materials to withstand regular use, leading to faster wear, glazing, and rotor damage. That squealing noise on a rainy Saturday? It was my wake-up call that cutting corners isn’t worth risking safety or wallet. My advice—look beyond price tags and focus on the durability and material quality of your brake components.
Tools and Tips That Changed How I Maintain My Brakes
Investing in a reliable torque wrench, like the CDI 2503, and a quality scan tool, such as the BlueDriver, has made diagnosing and installing brake parts more precise. Proper bedding-in procedures and thorough inspections of rotors and calipers ensure your brake system performs optimally, saving you from premature replacements down the line. Regular calibration of your tools and routine diagnostics can prevent small issues from becoming expensive repairs.
Fostering a Long-Term Mindset for Vehicle Care
Maintaining detailed repair records and staying informed about emerging issues—like GDI carbon buildup—help me anticipate maintenance needs. Keeping tools in top shape and updating diagnostic software keeps my engine and brake systems reliable. Remember, proactive care isn’t just about avoiding unexpected breakdowns; it’s about creating a safer, more cost-effective driving experience.
Insider Wisdom That Changed My Repair Approach
- Choosing quality brake pads can double or triple their lifespan, ultimately saving hundreds on rotor replacements.
- Proper installation and bed-in procedures are crucial to getting the full benefit of your brake components.
- Smart diagnostics and tool calibration help identify issues early, before they escalate into costly repairs.
- Keeping detailed records streamlines future maintenance and troubleshooting efforts.
Resources That Elevated My Automotive Knowledge
- This guide on balancing issues helped me understand the subtle nuances of wheel and tire maintenance.
- Learning about power steering fixes improved my confidence in tackling complex systems.
- DIY diagnostics for battery health saved me money and emphasized the value of good tools.
- Recognizing transmission signs complemented my understanding of vehicle interconnectivity and diagnostics.
Don’t Hesitate—Start Caring for Your Vehicle Today
Taking care of your car’s brake system with quality parts and proper practices isn’t just about safety—it’s about empowering yourself as a DIY enthusiast. Every repair and maintenance decision builds your knowledge and confidence. Remember, the real money-saving secrets are in prevention and informed choices. Now, I challenge you: are you ready to upgrade your maintenance routine and avoid costly surprises? Share your experiences below; I’d love to hear your stories about brake repairs or other DIY adventures.