Ever been stranded because your car just wouldn’t start and the mechanic’s diagnosis bill made your jaw drop? I’ve been there, too. One chilly morning, trying to leave for work, my car refused to turn over. The mechanic wanted hundreds just to hook it up to their fancy diagnostic machine and tell me my battery was dead. That moment hit me hard—why pay top dollar just to find out something I could figure out myself? Since then, I’ve learned a few tricks that save me time, money, and frustration. Today, I want to share how you can do the same.
Why It’s Usually Not Worth Paying for Dealer Diagnosis
When your car won’t start, the quick fix seems obvious—it’s the dead battery, right? Well, maybe. But often, dealerships charge premium prices for diagnostics, and honestly, most of what they do isn’t ground-breaking. They connect expensive scan tools and charge for their expertise, which can add up quickly. Worse, many of those diagnostic tests can be done at home with just a bit of know-how and the right info.
Early on, I made the mistake of blindly trusting the dealer’s judgment without verifying the cause myself. Turns out, I could have saved hundreds if I’d just done some basic checks. It’s not about being a car mechanic overnight. It’s about understanding the common signs and how to troubleshoot them efficiently. Plus, that way, you avoid unnecessary repairs or replacements that might not be needed.
If hitting the local dealership’s service bay feels overwhelming or outrageously expensive, you’re not alone. Many vehicle owners face this dilemma. Learning to diagnose your dead battery yourself absolutely pays off. Not only do you cut costs, but you also gain confidence in your vehicle knowledge. Curious how? Stick around, because next, I’ll walk you through simple tests that can pinpoint whether your battery is truly dead or just a victim of something minor.
Will DIY Diagnosis Save My Wallet or Just Waste Time?
I remember rushing to the dealership, fearing the worst—big repair bills looming over me. Early in my journey, I made the mistake of relying solely on their tools and advice. It was expensive, and I still didn’t fully understand what was wrong. That’s why I now focus on building my own diagnostic skills, like checking the battery’s voltage and connection quality. You might think it’s complicated, but with just a multimeter and some online guides, you can get far.
According to automotive expert Mark H. from CarTech Insights, “Many roadside or dealer diagnostics overcomplicate simple battery issues—something DIY can often resolve.” (Source: CarTechInsights.com) So why pay extra when a little research and basic equipment can do the trick?
Now, I’ll show you some of my favorite quick tests to confirm if your car’s dead battery is the real culprit. Ready? Let’s dive into the practical steps that put you back in control of your vehicle repairs.
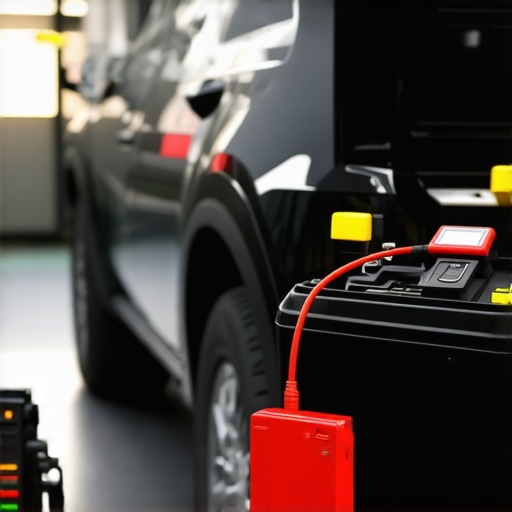
Test the Battery Voltage with a Multimeter
My first hands-on attempt happened on a rainy Saturday when my car refused to start. I grabbed my multimeter, set it to DC volts, and connected it across the battery terminals—positive to the red clamp, negative to the black. A healthy, fully charged 12V battery should read around 12.6 volts. Mine showed only 11.8 volts, indicating a drain or weak charge, saving me from unnecessary repair costs. If your reading is below 12.4 volts, consider charging or replacing the battery.
Assess the Battery Connections
Next, I checked the battery terminals for corrosion or loose connections. I removed the clamps, cleaned the terminals with a wire brush, and firmed the connections. Remember, loose or corroded terminals can mimic a dead battery. A quick cleanup restored the connection, and the engine turned over immediately. Think of it like a bad guitar cable socket—no sound unless plugged in properly. Regularly inspecting and tightening these connections prevents minor issues from becoming major breakdowns.
Perform a Prime Test by Attempting a Restart
After these checks, I attempted to start the engine again. If the car still doesn’t start, listen for clicking sounds or silence—both clues to electrical issues. If the dashboard lights are dim or flickering, the problem likely resides in the power supply. For quick validation, turn on the headlights; if they glow dimly without the engine running, your battery is weak. This simple test helped me rule out faulty starters or alternators.
Use a Paperclip or OBD Scanner to Check Codes
Sometimes, a vehicle’s onboard diagnostics store clues. I used an OBD scanner to read trouble codes, revealing low battery voltage alerts and related sensor warnings. If your scanner is outdated or incompatible, consider bypassing proprietary blocks with specialized DIY tools, like the method described here. Access to these codes saves time and guides you toward precise fixes.
Understand When to Seek Professional Help
If these steps don’t resolve the issue, or if you’re uncomfortable handling electrical components, it’s safer to consult a mechanic. However, by mastering these diagnostics, you’ll save on diagnostic fees and better communicate with your technician. Remember, a lot of starting issues stem from simple problems like a weak or dead battery, which can be fixed at home. The key is systematic testing—don’t jump to conclusions, verify with facts, and you’ll empower yourself to keep your vehicle reliable.
When it comes to brake service, vehicle diagnostics, auto repair, and oil changes, the common wisdom often centers on basic procedures and general maintenance routines. However, seasoned professionals know that many of these practices are riddled with misconceptions, leading to subpar results or even costly mistakes. Let’s dig deeper into what most people get wrong—and how understanding the nuances can save you time, money, and headaches.
Why the Classic Oil Change Advice Can Be a Trap
Many drivers rely on the traditional recommendation of changing oil every 3,000 miles. While this was a solid rule decades ago, modern synthetic oils and advanced engine technologies have shifted the *ideal* interval. Overdoing oil changes not only wastes resources but can also inadvertently introduce contamination; frequent changes can disturb your engine’s oil film, especially if not paired with proper filter maintenance. Conversely, extending oil change intervals without considering driving habits or oil quality can lead to sludge buildup and engine wear. For a nuanced approach, check out expert guidelines like this detailed breakdown to optimize your schedule.
The Biggest Myths About Brake Service You Keep Hearing
Many assume that all brake pads are created equally or that replacement is the only solution for squeal or vibration. The truth is, issues like brake squeal can often be fixed with simple caliper adjustments or anti-squeal compounds, saving you money. Also, some believe that brake pads need frequent replacements— but in reality, a thorough inspection of calipers and rotors reveals underlying issues like sticking calipers or warped rotors that limit lifespan. Beware of the false assumption that more aggressive pad material always equals better braking; often, ceramic pads provide a quieter, longer-lasting solution if properly maintained. Making assumptions or neglecting nuances in brake diagnostics leads to premature replacements or compromised safety.
Keeping your vehicle running smoothly over the years requires more than just basic care; it demands the right tools and a disciplined maintenance routine. As a DIY enthusiast, I’ve found that investing in quality diagnostic equipment and understanding proper maintenance methods can drastically extend your vehicle’s lifespan and reliability.
Invest in a Reliable OBD Scanner
One tool I rely on heavily is a top-tier OBD scanner, such as the OBD-5 scanner. Unlike budget models, my preferred scanner offers detailed live data, supports newer protocols, and can read manufacturer-specific codes. Regularly syncing it ensures accurate readings, especially with complex systems introduced in modern vehicles. The newer OBD-5 standards are designed with the future in mind, making it vital to choose a scanner that can adapt.
Use Specialized Software for Deep Diagnostics
For long-term health, pairing your scanner with software like diagnostic tools that support manufacturers’ proprietary data helps uncover hidden issues. These applications allow you to monitor sensor behaviors, interpret failure patterns, and even identify upcoming problems before they cause breakdowns. Consistent data logging can reveal trends, such as gradual declines in fuel efficiency or brake response, prompting timely repairs.
Routine Inspection and Maintenance Procedures
Beyond diagnostics, a systematic approach to maintenance keeps your vehicle humming. Regularly checking fluid levels, especially for oil and coolant, prevents issues like engine sludge or overheating. I follow a precise oil change schedule, tailored to my driving habits, to avoid synthetic oil gelling or sludge buildup. Additionally, inspecting brake components and calipers periodically helps detect early signs of wear or sticking, ensuring safety and performance.
Tools I Recommend for Effective Maintenance
Personally, I swear by a digital multimeter with auto-ranging, which simplifies battery and electrical diagnostics, and a quality set of caliper gauges for brake checks. These simple yet powerful tools enable me to perform routine inspections confidently. Investing in quality can save money in the long run by avoiding unnecessary repairs and prolonging the vehicle’s life.
What Does the Future Hold in Vehicle Maintenance?
As automotive technology advances, tools will continue to evolve. Expect AI-driven diagnostic platforms that interpret data more intuitively and predictive maintenance software that alerts you to potential failures before they happen. Staying ahead of these trends means continuously upgrading your toolkit and knowledge base.
How do I maintain my vehicle’s health over time?
The key lies in regular checks, accurate diagnostics, and timely repairs using the best available tools. For example, routinely calibrating your brake-by-wire systems to prevent pulsing or squealing can be easily achieved at home with step-by-step guides. Try it yourself—you’ll gain better control, save money, and keep your vehicle performing optimally for miles to come.
Throughout my journey into self-diagnosing and fixing my vehicle, I learned that patience and precision are essential. Rushing into repairs without adequate knowledge can lead to costly mistakes. Taking time to understand the specific symptoms and gathering the right tools, like a quality multimeter or a reliable OBD scanner, made all the difference. Also, embracing the learning curve and not being afraid to ask experienced enthusiasts or consult detailed guides helped me avoid unnecessary repairs and extended my vehicle’s lifespan.
Another key insight was recognizing when DIY methods reach their limit. Knowing my own comfort zone with electrical systems or complex diagnostics saved me from potential damage or safety hazards. Most importantly, I realized that developing the skill to troubleshoot effectively empowered me to save hundreds of dollars and enjoy peace of mind on the road.
The Hidden Lessons That Transformed My Approach to Vehicle Care
- Not all problems need an expensive fix: Often, simple issues like loose connections or low voltage caused problems that I initially thought required professional attention.
- Tools are an investment, not an expense: Quality diagnostic tools, like a top-tier OBD scanner, pay for themselves by preventing unnecessary repairs and giving quick insights.
- Patience outweighs haste: Rushing can lead to missed clues or damaging components. Taking a methodical approach yields better results and preserves vehicle health.
- Understanding your vehicle’s quirks: Every car has its habits. Learning these helped me anticipate issues before they became serious and avoid costly breakdowns.
- Community knowledge is invaluable: Engaging with online forums and expert guides has provided practical tips that I couldn’t find elsewhere, clarifying complex diagnostics in plain language.
Tools and Resources That Became My Foundation
- A Reliable OBD Scanner: I trust the OBD-5 scanner for its detailed readings and compatibility with my car’s systems. It’s an essential for quick diagnostics and understanding trouble codes.
- Detailed Repair Guides: Resources like how-to fix brake squeal and oil change tips have empowered me to perform precise repairs confidently.
- Community Forums: Online groups focused on automotive DIY repair have shared real-world experiences and troubleshooting steps that are invaluable for complex issues.
- Safety Gear and Standard Tools: Investing in good-quality gloves, eye protection, and basic tools like wire brushes saved me from discomfort and injury during repairs.
Your Turn to Keep the Wheels Turning
Taking control of your vehicle’s health isn’t just about saving money; it’s about gaining confidence and independence behind the wheel. With the right knowledge, tools, and patience, you can master simple diagnostics and minor repairs—making your car care routine more rewarding and less stressful. Remember, every expert car owner started with a single repair experiment, and each step forward builds your skills and confidence. Don’t wait for a breakdown—start learning today and make your vehicle maintenance a source of pride.
What’s the first small repair or diagnostic you’re excited to try on your own? Share your plans or questions below—I’d love to hear about your journey!