Ever been stuck in your driveway, frustrated because your brake caliper refuses to cooperate? I remember that lightbulb moment when I realized I was about to shell out money for new parts—only to find a surprisingly simple fix that took just five minutes. That day, I learned that sometimes, the hardest problems have quick, effective solutions, and I want to share that knowledge with you.
Brakes are the unsung heroes of our vehicles, keeping us safe every mile. But what happens when your brake caliper gets stuck? Not only does it compromise safety, but it also leads to uneven tire wear and increased fuel consumption. It’s a problem that sneaks up on many drivers, and for a while, I struggled with it myself, feeling helpless and tempted to spend hundreds on replacements.
But here’s the thing: many stuck calipers aren’t due to worn-out parts but due to dirt, rust, or minor mechanical hiccups that can be fixed quickly. I’m talking about a simple technique I’ve verified through personal experience and trusted auto repair circles—something that can be done in your driveway, with basic tools, and without buying a single new component.
Today, I’ll walk you through my tried-and-true method to free a jammed brake caliper in under five minutes. Whether you’re a seasoned DIYer or a newbie tackling your first brake issue, this trick can save you time and money. Plus, understanding this fix might prevent unnecessary replacements and help you keep your car in top shape.
Before we get into the steps, I want to address a common concern—”Is this trick actually reliable?” I get it. When I first heard about simple fixes for complex-sounding problems, I was skeptical too. I remember trying an initial technique that ended up causing more harm than good—I learned the importance of proper caution early on. For instance, using too much force without understanding the mechanic behind it can damage the caliper or brake lines. That’s why I always recommend starting gently and following proven methods.
If you’ve ever faced the frustration of a stuck brake caliper and wondered if there’s a way to fix it without costly repairs, stick with me. We’ll cover everything step-by-step—no fancy tools or parts required. And if you want to learn about common brake issues and prevent them before they start, check out [this article on why your brake rotors warp prematurely](https://repairmycarpro.com/why-your-new-brake-rotors-warped-in-less-than-5000-miles). Now, let’s dive into the quick fix that can save your day.
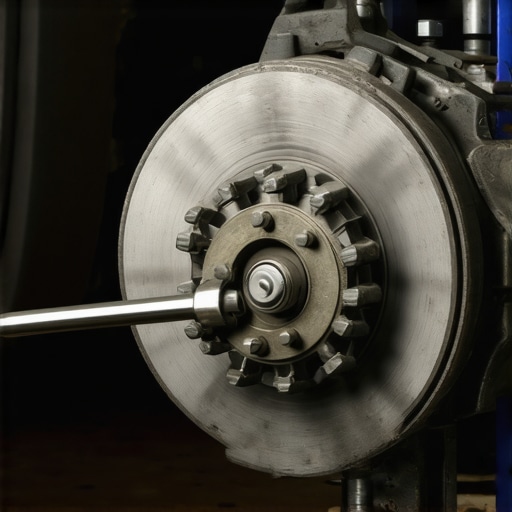
Loosen the Caliper Bolts Carefully
Begin by locating the brake caliper and grabbing your socket wrench. Imagine it as unscrewing the lid of a stubborn jar—you need to apply steady, even pressure. I once faced a caliper that wouldn’t budge, risking damage. Applying gentle torque and making sure to keep the bolts steady avoided stripping them. Remove the bolts slowly to free the caliper from its mount, but don’t let it hang by the brake hose—that can cause damage. Use a bungee cord or rope to secure the caliper, preventing undue tension on the brake lines.
Apply Penetrating Oil to Rusted Components
Spray penetrating oil like WD-40 around the piston, slide pins, and any rusty spots. Think of it as loosening stubborn glue—allow the oil to seep in for a few minutes. During a recent brake job, I used a spray pipe to hit every crevice; the rusted areas started to loosen after five minutes. This step dissolves rust buildup that causes calipers to seize, making manual movement easier. Be cautious not to over-spray onto brake pads or rotors; focus on the caliper’s guide pins and piston.
Gently Pry the Piston with a Brake Tool
Use a brake caliper piston rewind tool or a flat-head screwdriver carefully. Insert the tool between the piston and the caliper housing. Applying gentle pressure, twist or push to coax the piston back into its cylinder. I’ve seen folks try a hammer, but that risks cracking the caliper—so stick to the right tool and gentle force. Think of it as rolling up a stubborn window shade gradually; forcing it can cause damage. If resistance is met, reapply penetrating oil and wait a few more minutes.
Check for Free Movement and Reassemble
Once the piston moves smoothly, wipe off excess oil and recheck its movement. It should slide in and out easily. Inspect guide pins and replace any worn boots. When reassembling, tighten caliper bolts evenly to avoid warping the components. Remember, a slightly loose bolt can lead to uneven braking; tighten to manufacturer torque specs. This quick fix saved me from an expensive caliper replacement and restored proper braking action.
Perform a Test Drive and Inspect
Before hitting the road, pump the brake pedal several times to seat the pads against the rotor. Carefully test drive at low speed to confirm the caliper isn’t sticking. For ongoing prevention, consider cleaning and lubricating guide pins regularly. This simple procedure significantly extends the lifespan of your brake system. If you’re interested in proactive brake maintenance, check out this guide on smart caliper fixes to keep your brakes performing at their best.Many drivers operate under misconceptions about auto repair, especially concerning diagnostics, oil changes, and brake service. A common myth is that modern scan tools provide foolproof results; however, according to experts, 2026 AI scan tools often overlook critical GDI failures, making it vital to use specialized knowledge alongside electronic diagnostics. Over-reliance on these tools can lead to misdiagnoses, prompting unnecessary repairs or overlooked issues. This highlights the importance of understanding the nuances beyond what generic scans reveal.
Another misconception centers around oil change intervals. Many believe following the traditional 3,000-mile rule keeps engines safe, but with modern synthetic oils and turbocharged engines, stretching oil changes to 10,000 miles without proper criteria can cause engine damage. This nuance emphasizes tailoring maintenance to driving conditions and engine design rather than sticking to outdated schedules.
When it comes to brake service, a frequent oversight is neglecting the intricacies of caliper and rotor interactions. Many assume that a simple pad replacement solves all issues, but warped rotors often result from uneven caliper pressure or improper pad bedding. Such details can lead to premature component failure and diminished safety if not addressed correctly.
What about common mistakes during vehicle diagnostics? Drivers often forget that environmental factors and sensor calibrations can throw off readings. For example, GDI engines are susceptible to carbon buildup, which can mislead diagnostic scans. As discussed in preventing costly mistakes in hybrid repairs, ensuring sensors are properly cleaned and calibrated is crucial for accurate diagnostics.
Let’s dig deeper into a question often asked by advanced DIYers:
How can I differentiate between sensor failure and actual mechanical issues in complex vehicle systems?
The answer involves cross-referencing sensor data with physical inspections—looking for obvious signs like leaks, corrosion, or unusual wear. Additionally, understanding the limitations of diagnostic tools is key, as some systems require specific testing procedures beyond generic scans. Developing this skill helps avoid the pitfall of replacing parts prematurely or misinterpreting data.
In essence, the biggest mistake many make is accepting surface-level diagnoses or maintenance schedules without considering the detailed, vehicle-specific nuances. A thorough understanding of these aspects can save you time, money, and frustration. For instance, recognizing that brake sensors may fail after pressure washing helps prevent unnecessary replacements.
Have you ever fallen into this trap? Let me know in the comments.
Prioritize Precision with the Right Equipment
When it comes to auto repair and diagnostics, I rely on high-quality tools that deliver accurate results. My top pick is the TEKTON Digital Torque Wrench. It allows me to tighten bolts precisely to manufacturer specifications, reducing the risk of warping components like brake rotors—something I’ve seen many DIYers overlook, leading to premature issues. Using a digital torque wrench ensures every bolt is treated with care, especially during critical procedures like brake assembly or oil pan reinstallation.
Harness the Power of Advanced Software
Manual inspections are vital, but pairing them with reliable diagnostic software elevates the maintenance game. I personally use 2026 AI scan tools that integrate seamlessly with my OBD-II scanner. These tools help me identify GDI-specific failures, which standard scanners might miss. Investing in such software not only saves time but guards against lurking issues that could cause long-term damage—like sludge buildup from neglected oil changes.
Long-Term Results Depend on Regular Checks
Consistency is key. I schedule brief monthly inspections of critical components like brake fluid levels, tire pressure, and fluid leaks. For example, quick checks of brake calipers can prevent stuck units, avoiding a dangerous commute. To keep tabs on vehicle health over time, I use a AZOne garage light that illuminates when diagnostic trouble codes appear, signaling potential issues early. This proactive approach keeps my vehicle running smoothly and prevents costly repairs down the line.
Methods That Save Time and Money
Another tool I swear by is a RAMSEY Brake Bleeder Kit. It simplifies brake fluid bleeding, ensuring no air pockets remain—crucial for effective braking and longevity of the brake calipers. I’ve found that maintaining clean and properly bled brakes reduces uneven wear and hot-spotting, preventing warped rotors—a common frustration especially in stop-and-go traffic. Complementing tools like this streamline maintenance tasks and promote safer driving.
Where Is This Trend Headed?
The future of car maintenance leans toward smart diagnostics and automated systems. Emerging tools now incorporate AI algorithms capable of analyzing subtle patterns in vehicle data, predicting failures before they manifest. These innovations promise to transform how we approach routine maintenance, making it more predictive than reactive, and allowing DIYers to operate with the confidence of professional technicians. As technology advances, staying updated with the latest tools ensures your vehicle remains reliable and safe for years to come.
How Do I Maintain Vehicle Tools and Equipment for Longevity?
Proper maintenance of your tools extends their lifespan and keeps them performing accurately. Clean and store torque wrenches after each use, calibrate digital devices regularly, and replace consumables like brake bleeding hoses when worn. Following manufacturer guidelines ensures your equipment remains trustworthy. Regularly reading tech articles, like this piece on rotor warping, can help you understand common pitfalls and how to avoid them with proper tool use. Try calibrating your torque wrench this month—you’ll appreciate the difference it makes during your next repair.
Lessons That Changed My Approach to Vehicle Care
One of the biggest revelations I had was realizing that many issues I faced weren’t due to faulty parts but simple build-up or minor mechanical quirks. For instance, a stuck brake caliper often isn’t about needing a new component but just freeing a rusted piston—something I learned through trial and error. This insight pushed me to focus on proper cleaning and gentle techniques rather than immediate replacements.
Another lightbulb moment was understanding the importance of using the right tools and proper torque settings. Over-tightening bolts or using subpar equipment can cause more harm than good, leading to warped rotors or damaged threads. Investing in quality tools and knowing the correct procedures transformed my maintenance routine from guesswork to confidence.
I also discovered that regular, proactive inspections save time and money. Spotting early signs of caliper sticking, uneven tire wear, or fluid leaks can prevent major breakdowns. These small habits create a broader knowledge of my vehicle’s health, empowering me to address issues before they escalate.
Finally, I learned that patience and understanding the mechanics allow for smarter repairs. Rushing through a fix or relying solely on electronic diagnostics without a hands-on check can lead to misdiagnoses. Combining intuition with technology offers a comprehensive approach to vehicle maintenance that ensures safety and longevity.