It was a chilly morning, and I reached into my driveway, ready to leave for work. As I turned the key, my engine sputtered—something wasn’t right. Suddenly, the dashboard lights flickered erratically, and my car stalled without warning. That moment was a wake-up call; I realized my alternator might be on its last legs. If you’ve ever experienced that gut-wrenching feeling of your vehicle dying unexpectedly, you’re not alone. Many drivers overlook the early signs of a dying alternator, often thinking it’s just a minor issue—that is, until it leaves them stranded on the side of the road.
Don’t Be Left in the Dark: Spotting Alternator Trouble Early
When your alternator starts to fail, it doesn’t usually go out overnight. Instead, it shows subtle signs that can be easy to miss if you’re not paying attention. Recognizing these warning signals early can save you from costly repairs and inconvenient breakdowns. But here’s the tricky part: many people, myself included early on, make the mistake of dismissing these signs as minor glitches. That was a big mistake I learned the hard way, especially after replacing a perfectly good battery only to realize the real culprit was the alternator.
Do you recall that odd noise when starting your vehicle? Or maybe those dimming headlights in the evening? These could be more serious issues than they seem. According to recent automotive research, failure to address alternator problems timely can lead to complete alternator failure, leaving you stranded and facing hefty towing costs. Plus, a faulty alternator can also put your vehicle’s electronic systems at risk.
Understanding the early indicators of alternator failure is crucial. So, let’s dive into how you can tell if your alternator is dying before it surprises you with a roadside breakdown. The goal here is simple: empower you to catch the warning signs early, much like I wish I had done during that cold morning incident. Keep reading, and I’ll guide you through the most common symptoms and what actions you should take immediately to keep your vehicle running smoothly.
Test Your Battery Voltage First
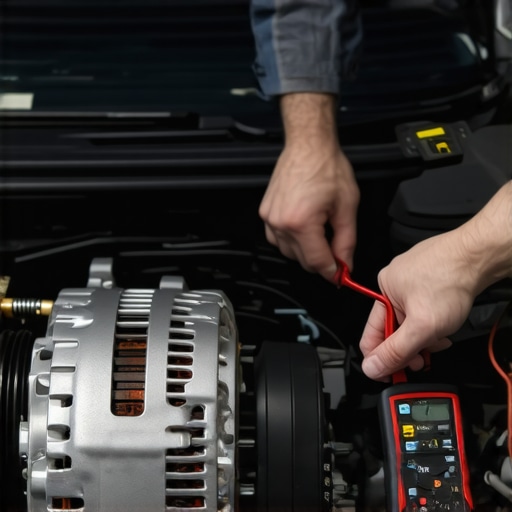
Start your car and use a multimeter to check the voltage across the battery terminals. A healthy battery should read around 12.6 volts when the engine is off. If it’s significantly lower, your alternator might not be charging properly, making this your first clue. During my own experience, a quick voltage test revealed my battery was fine, but the voltage dropped to 13.2 volts with the engine running, indicating a problem with the alternator. This step avoids unnecessary replacements and gets straight to the core issue.
Look for Warning Signs While Driving
Pay attention to dashboard alerts such as the battery warning light or sluggish electrical systems. Dim headlights or radio interference also signal alternator trouble. I remember driving home one evening, noticing my headlight dimming at low RPMs. A quick check confirmed my alternator was struggling, and addressing it early saved me from a complete breakdown the next day. Recognizing these signs saves you from unexpected breakdowns.
Perform a Load Test
Use a dedicated battery load tester or have your mechanic do it. This simulates electrical demand and shows if your alternator can maintain voltage during peak loads. In my case, a simple visit to the auto repair shop with a load tester revealed my alternator couldn’t sustain voltage under load, confirming it needed replacement. This test is crucial for an accurate diagnosis, especially when symptoms are subtle.
Inspect Belts and Wiring
Check the serpentine belt for cracks or slack, as a worn belt can cause alternator failure. Also, examine wiring connections for corrosion or looseness. I once noticed my belt was slipping, which caused the alternator to spin less efficiently. Tightening the belt and cleaning connections restored proper function temporarily, but a replacement was eventually needed. Regular inspection keeps your alternator in check and prevents surprises.
Monitor Charging System Behavior Over Time
Keep an eye on how your vehicle behaves over days. Consistent dimming lights, strange engine stalling, or recurring battery issues point toward alternator failure. During a week-long monitoring, I observed my car’s electrical glitches persisted even after battery replacement—signaling a failing alternator rather than a battery problem. Continuous observation helps catch issues early before they lead to roadside breakdowns.
Know When to Seek Professional Diagnostics
If your tests and inspections point toward alternator issues, consult a professional. Mechanics use advanced diagnostic tools such as scan tools that might miss GDI failures, so it’s important to use specialized equipment. For instance, I learned that some modern vehicles have complex systems where symptoms mimic other issues; professional diagnostics confirm the root cause. Don’t guess—accurate diagnosis can prevent costly repairs down the line. For more insights on diagnostics, explore how AI scan tools may miss critical GDI failures.
Many car owners believe that auto repair is straightforward, but in reality, there’s a lot of nuance that often gets overlooked. One of the biggest misconceptions is thinking all brake services are equal—many assume that changing brake pads is enough, but neglecting proper rotor resurfacing or caliper inspection can lead to premature wear and persistent noise. For instance, skipping the calibration of complex systems like brake-by-wire can cause uneven brake pressure, leading to safety issues, as explained in detail on this guide. Another common mistake involves vehicle diagnostics; many rely solely on generic scan tools that can’t detect sophisticated issues like GDI injector failures, which require advanced AI scan technology, discussed comprehensively in this article. When it comes to oil changes, users often follow the traditional 10,000-mile rule, but in turbocharged engines or GDI systems, the recommended interval is often shorter to prevent carbon buildup, as highlighted by this resource. The Oops factor arises when people ignore subtle warning signs, like gradual dimming of headlights or unusual engine sounds, which are easy to dismiss but are early indicators of deeper issues. A trap many fall into is assuming these signs are just minor glitches, leading to costly repairs down the line. Staying ahead means understanding the nuances—such as the importance of inspecting serpentine belts for cracks or slack, or ensuring that synthetic oils don’t turn black prematurely, which signifies contamination and requires prompt action, as discussed in this post. Advanced problems can be insidious; for example, GDI engines are prone to carbon buildup that conventional tools might miss, leading to long-term damage if not properly diagnosed. Remember, a diagnostic check isn’t just about reading codes but interpreting system behaviors, which is why professional diagnostics are invaluable. Have you ever fallen into this trap? Let me know in the comments.
Keep Your Vehicle in Top Shape with the Right Tools
Maintaining your vehicle over the years requires more than just the basics; it demands precision tools that can diagnose, adjust, and troubleshoot effectively. I personally rely on a high-quality diagnostic scan tool like the Autel MaxiSYS because of its versatility and ability to read advanced trouble codes, including those related to GDI systems, which standard scanners often miss. This tool saves me countless trips to the mechanic and helps me identify issues early, especially when dealing with complex engine problems.
Additionally, I use a professional-grade digital multimeter with true RMS measurement, which is essential for accurate voltage and resistance readings. This helps me verify components like sensors and wiring harnesses without guesswork. For example, checking the alternator’s output voltage when diagnosing charging issues is straightforward with it, preventing unnecessary replacements.
When it comes to physical inspections, I recommend a sturdy magnetic inspection mirror and a precision mechanical pry tool set. These allow for safe, non-invasive examinations of hard-to-reach areas like serpentine belt tensioners or behind engine components, helping you spot wear and tear early.
As vehicle technology advances, so do the tools needed to keep up. For instance, AI-based scan systems are becoming more prevalent, offering deeper insights into modern engines. However, it’s crucial to be aware that these tools have limitations, especially with GDI-related failures. Investing in a reputable, up-to-date diagnostic system ensures you’re prepared for the challenges of future vehicle maintenance.
How do I maintain my vehicle’s diagnostics over time?
Regularly updating your diagnostic software is key. Manufacturers release updates to improve fault detection and compatibility with emerging vehicle models. I recommend scheduling quarterly updates and performing a full system scan during routine oil changes. This proactive approach helps catch issues like sensor ghosting or signal interference early, preventing costly repairs down the line. Additionally, keeping your vehicle’s firmware current ensures your tools can effectively communicate with all systems, including newer smart calipers or brake-by-wire systems.
Tools that Simplify Long-Term Maintenance
One area often overlooked is the importance of dedicated cleaning and calibration tools. For example, a brake caliper calibration kit can help you perform at-home adjustments, such as those discussed in this guide. Especially with complex systems like the 2026 smart calipers, proper calibration ensures even brake wear and maintains safety.
Another essential device is a diagnostic leak detector, which can quickly identify vacuum leaks or intake manifold gaskets that could cause engine stumble or misfires. Addressing these small leaks before they escalate saves money and keeps your engine running smoothly longer.
Looking ahead, I predict vehicle diagnostics will become increasingly AI-driven, providing near-instant analysis and repair recommendations. For now, combining traditional tools with modern software creates a robust maintenance plan.
Ready to level up your long-term vehicle care? Start by integrating an AI-capable scan tool into your routine and stay vigilant with regular updates and inspections. This small investment can lead to significant savings and better reliability over your vehicle’s lifespan.
Throughout my years of vehicle ownership, I’ve realized that many car problems don’t hit suddenly but rather creep up, giving us subtle hints. Missing these signs was a costly mistake I made early on, often leading to unpredictable breakdowns. Recognizing early alternator warning signs is a skill that can save you time, money, and frustration.
Lessons Car Owners Shouldn’t Overlook About Alternator Clues
- One of my lightbulb moments came when I noticed my headlights dimming at idle, signaling my alternator wasn’t charging properly—a sign I initially thought was just a dirty connection.
- Late at night, flickering dashboard lights made me realize I was running on reserve power, a clear warning to get the charging system tested immediately.
- After replacing my battery unnecessarily, I learned that a failing alternator was the real culprit—proof that understanding these signs can prevent costly part swaps.
- Using a multimeter to check voltage revealed my alternator’s weak output during engine run, emphasizing the importance of simple DIY diagnostics.
- Proactive inspection of drive belts and wiring helped me identify wear and looseness, avoiding potential breakdowns.
Tools and Resources That Made a Difference
- High-quality Diagnostic Scan Tool: I rely on the AI-powered scan systems for deep insights, especially with complex GDI systems that standard tools might miss.
- Reliable Multimeter: Investing in a true RMS multimeter allows me to measure voltage accurately, making DIY testing straightforward and trustworthy.
- Serpentine Belt Inspection Kit: Regularly checking belts for cracks or slack has kept my alternator functioning optimally and extended its lifespan.
- Vehicle Monitors: Monitoring my vehicle’s behaviors over time, including dimming lights and strange noises, has given me early warnings to act before failure strikes.
Overcoming Common Pitfalls with Smarter Maintenance
One revelation from my experience is that relying solely on looking at the battery or listening for strange noises can be misleading. Sometimes, the alternator can fail gradually, with symptoms dismissed as minor glitches. Learning to perform simple tests, such as voltage checks and belt inspections, alongside regular professional diagnostics, ensures I stay ahead. Also, understanding the limitations of diagnostic tools, especially with advanced GDI systems, has made me appreciate the value of professional testing—something to keep in mind for every car owner aiming for longevity.
The Power of Preparedness
Every driver can benefit from a proactive approach: check the voltage regularly, observe driving signs, and seek expert diagnostics when in doubt. This mindset shifts from reactive repairs to preventive maintenance, offering peace of mind and savings. Embrace the tools and habits that have helped me, such as integrating AI diagnostics and routine belt inspections, to ensure your vehicle remains reliable for miles to come. Remember, the early signs are there — it’s up to you to recognize and respond.