It was late afternoon when I noticed that unmistakable burning smell wafting through my garage. At first, I thought it was just some spilled oil from my last DIY fix, but as the smell intensified, I realized something was seriously wrong. That lightbulb moment—when I understood ignoring engine leaks could lead to costly repairs—hit me hard. Have you ever experienced that sinking feeling when your car starts to burn oil, but you’re unsure where it’s leaking from? If so, you’re not alone.
Spotting the Hidden Leaks Before They Wreak Havoc
Many drivers overlook small oil leaks, dismissing them as minor drips or nothing to worry about. But those tiny leaks can gradually escalate, causing real damage over time. Today, I’ll guide you through identifying the three most sneaky spots where engines tend to leak oil. Knowing these locations can save you headaches and money in the long run. And trust me, I’ve been there—early on, I made the mistake of ignoring a slow leak near the oil filter, which later turned into a full-blown engine issue. Don’t let that happen to you.
Is Spotting Oil Leaks Worth the Hype?
You might be skeptical—”Is this really something I need to worry about?”—but neglecting leaks can lead to engine failure, often costing thousands in repairs. According to a recent study, overlooked oil leaks are among the leading causes of engine damage in vehicles older than five years. I learned this the hard way when I had to replace my entire engine because I ignored that persistent burning smell. The key is doing a quick check now and then. Interested in some practical tips? Stick around, because I’ll show you how to spot those sneaky leaks before they turn into a nightmare. Curious if you’ve already encountered parking lot oil spots or a sudden burning smell? It might be time for a closer inspection.
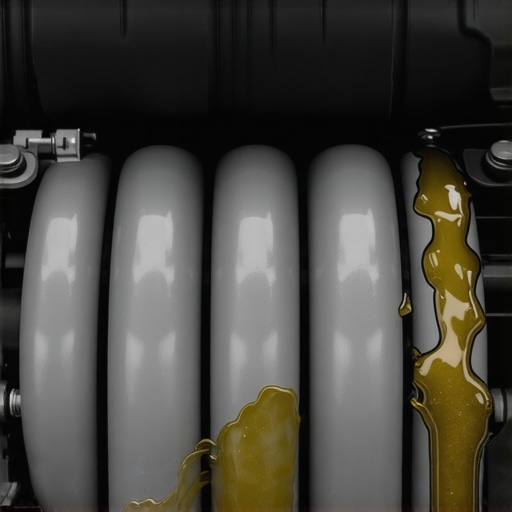
Start with a Visual Inspection of Leaking Areas
Begin by parking your vehicle on a level surface and turning off the engine. Wait for it to cool down to avoid burns. Look under the engine for fresh oil spots—these are usually darker and more viscous. Pay close attention to common leak points like around the oil filter, drain plug, and valve cover gasket. Use a flashlight if necessary to spot cracks or misplaced seals. In my experience, even a small smear near the oil filter can turn into a significant leak if left unchecked, leading to engine damage.
Check Your Oil Level and Quality
Before diving into repairs, verify your oil level with the dipstick. Low oil can cause engine components to wear faster. Remove the dipstick, wipe it clean, reinsert it fully, then pull it out again to read the level. If it’s below the recommended mark, add oil accordingly. Also, observe the oil’s color and viscosity; dark, gritty oil indicates it’s overdue for a change and may conceal leaks. Being proactive with regular checks helps catch leaks early before they escalate.
Apply the Soap and Water Test for Hidden Leaks
Mix a solution of dish soap and water, then spray it onto suspicious areas. Start the engine and let it run for a few minutes. Oil leaks will often produce bubbles or foam at the leak site, revealing hidden cracks or seal failures. This quick test saves time compared to inspecting hot, greasy engine parts. I once used this method on a stubborn leak near the timing cover—found a tiny crack I wouldn’t have seen otherwise, allowing me to plan a precise fix.
Use a UV Dye for Precise Leak Detection
For persistent or hard-to-find leaks, add a UV dye to your engine oil. Run your engine for about 30 minutes to circulate the dye. Then, using a UV flashlight, inspect the engine components. Fluorescent traces will highlight leak points clearly. This method is especially useful for leaks originating from seals or gaskets that do not produce obvious drips. I’ve successfully employed this technique to locate a minor leak behind the valve cover, preventing a costly repair later.
Replace Faulty Seals and Gaskets
If you’ve identified specific components like the valve cover gasket or oil pan seal as the leak source, replacement is necessary. Remove the affected part following the manufacturer’s instructions, clean the mating surfaces thoroughly, and install a new seal or gasket. For example, I replaced a leaking valve cover gasket after removing the cover, cleaning the sealing surface with a gasket scraper, and applying a new gasket sealant. Proper torquing of bolts is crucial to prevent future leaks.
Secure and Test the Repair
After replacing seals, refill engine oil to the proper level and start the engine. Let it idle for a few minutes and observe for signs of leakage. Recheck the oil level and look underneath for drips. It’s also wise to drive the vehicle for a short distance and re-inspect. This ensures the fix holds up under different operating conditions. Remember, if leaks persist, consulting a professional might be the best course to avoid engine damage.
Many vehicle owners operate under misconceptions about auto repair, often leading to costly mistakes. For instance, a common myth is that all oil changes can be done at any interval, but modern engines and oil formulations require adherence to specific mileages and conditions, such as the 3000-mile rule for turbocharged engines to prevent sludge build-up. Overlooking this nuance can cause internal engine damage, a fact supported by recent industry research emphasizing precise maintenance schedules. Another trap is assuming brake service is a simple, quick fix; however, modern systems like brake-by-wire demand thorough diagnostics and calibration, as detailed in guides on 7 warning signs of brake-by-wire failure. Many neglect vehicle diagnostics, believing that generic scanner tools suffice, but advanced vehicles feature proprietary modules that can only be bypassed using specialized diy tools—see this DIY bypass method. An often overlooked nuance involves vehicle electronic systems’ sensitivity to external influences. For example, high-pressure cold starts may severely damage oil filters if not properly managed, a topic covered extensively in expert articles. Handling these advanced issues requires an understanding beyond basic troubleshooting; adopting multi-layered diagnostic and service approaches ensures longevity and performance. Don’t fall into the trap of oversimplification—it’s essential to stay informed about evolving vehicle systems. Have you ever fallen into this trap? Let me know in the comments.
Choosing the Right Equipment for Reliable Repairs
Investing in quality tools is crucial for maintaining your vehicle over time. Personally, I rely on a high-quality OBD-II scanner to accurately diagnose engine issues quickly. The DIY diagnostic tool I use is compatible with most modern vehicles, including those with proprietary modules, ensuring I don’t get locked out of critical data. Additionally, a digital multimeter helps me verify electrical components, while a reliable torque wrench guarantees proper bolt tension during repairs, preventing future leaks or component failures. These tools keep my work precise and efficient.
Streamlining Maintenance with Software and Data Analysis
Modern vehicles benefit from advanced software for routine maintenance tracking. I recommend using vehicle-specific maintenance apps that sync with your OBD-II scanner. This integration provides real-time updates on oil life, brake sensor status, and system alerts. Staying ahead with this data means you can schedule repairs proactively, avoiding costly breakdowns. Experts predict that as vehicle electronics become more complex, diagnostic software will evolve into AI-assisted tools, offering predictive maintenance insights, as noted in recent industry analyses.
Why Regular Checks and Calibration Matter
Even with top-tier tools, regular calibration and checks are essential. For example, recalibrating brake sensors after replacing calipers or performing software updates ensures systems function correctly. I often use a dedicated calibration kit for brake-by-wire systems, especially after performing service on 2026 brake system components. Regular calibration prevents false alerts and maintains safety. Keep in mind, sticking to manufacturer-recommended calibration procedures—like those outlined in technical service bulletins—can save you from future troubleshooting headaches.
How do I maintain vehicle diagnostics over time?
Maintaining vehicle diagnostics requires consistent software updates and sensor checks. I periodically update my scan tool firmware to stay compatible with the latest vehicle systems. Also, I inspect sensors like ABS and TPMS for dust, corrosion, or damage, replacing them as needed. For complex issues, consulting detailed guides on proprietary diagnostic systems can improve accuracy. Additionally, leveraging open-source diagnostic software, as recommended by professional automotive technicians, can provide deeper insights into system faults and help extend the lifespan of your vehicle’s electronic components.
Try incorporating a professional-grade scan tool into your maintenance routine. Accurate diagnostic data helps avoid unnecessary repairs and ensures your vehicle runs smoothly for mile after mile. With the right tools, consistent calibration, and data management, you can keep your car in excellent condition well beyond the warranty period.
Lessons That Changed My Approach to Auto Maintenance
One of the most valuable insights I gained was the importance of patience when diagnosing leaks. Rushing to fix things without proper inspection often leads to recurring issues. I learned to take a step back, analyze the problem thoroughly, and then execute repair plans confidently.
Another realization was that investing in quality tools, like a reliable UV dye kit or a good torque wrench, is not a luxury but a necessity. Using subpar equipment often makes simple fixes more complicated or ineffective. This investment saves both time and money in the long run.
I also discovered that understanding your vehicle’s specific quirks—like knowing common leak points or the special considerations for high-pressure cold starts—allows for more targeted and effective repairs. A little research can go a long way in preventing headaches down the road.
Finally, I recognized that regular training and staying updated with the latest repair techniques—like software calibration or proprietary system bypasses—keep my skills sharp and my vehicle running smoothly. Continuous learning is key in the evolving world of auto tech.