Ever been blinded by your own headlights struggling to pierce through the foggy haze, especially on those early morning drives? I remember the first time I noticed mine looked more like icy, cloudy eyes staring back at me. It hit me—those headlights had become a dull, yellowed mess, reducing visibility and making my car look older than it really was. Frustrating, right? I tried those fancy kits everyone raves about, but honestly, they felt more like a quick fix than a real solution, and some didn’t even last beyond a few washes.
One evening, after yet another dim morning commute, I had what I call my ‘lightbulb’ moment. What if I could restore my headlights using everyday household items? That question led me down a path of trial and error, and let me tell you—it’s been a game-changer. Today, I want to share what I discovered about achieving clear, bright headlights without investing in costly kits.
Why Most DIY Headlight Restorations Fail or Fall Short
Many folks, including myself at first, fall into the trap of believing that expensive kits are the only way to tackle foggy headlights. A common mistake I made early on was skipping thorough cleaning before polishing; I thought a quick scrub would do the trick. Turns out, grease, dirt, and the yellowed, oxidized layer on the surface are the real culprits behind the haze. If you don’t remove that thoroughly, any polishing step will be largely ineffective—a classic mistake I can’t count how many times I made.
What I learned is that the key isn’t just about polishing but about better preparation. A good cleaning, using common household supplies like toothpaste, baking soda, or even WD-40, can make a visible difference. These aren’t miracle cures, but they work surprisingly well if you understand what causes the cloudiness in the first place.
Did you know that UV exposure accelerates the yellowing and oxidation of headlights? According to automotive experts, headlights can deteriorate up to 20 times faster when exposed to sunlight without protection. That’s a significant reason why many headlights become dull within a few years.
So, if you’re tired of struggling with cloudy headlights and don’t want to spend a fortune on kits that might let you down, stick around. I’ll walk you through a simple, proven method using stuff you probably already have at home — I promise, it’s easier than you think and lasts way longer than those spray-on solutions. Ready to see your headlights shine bright again? Let’s get started.
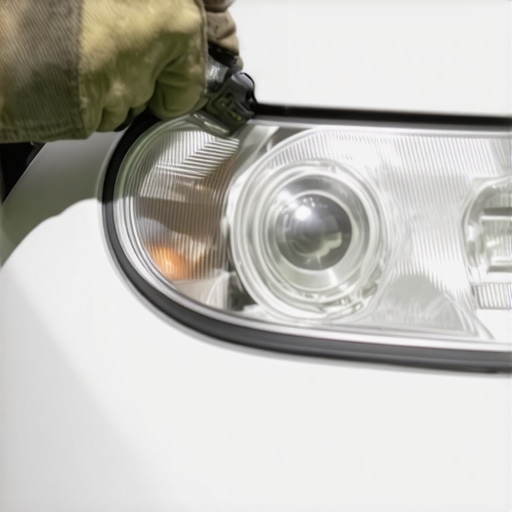
Gather Your Supplies
First, collect toothpaste, baking soda, masking tape, microfiber cloth, water, and a spray bottle. I remember last summer, I had a bottle of the cheapest toothpaste in my bathroom cabinet, which I decided to use for this project. The toothpaste acts like a gentle abrasive to smooth out the oxidized layer, much like polishing out scratches on a jewelry piece.
Clean the Headlights Thoroughly
Begin by washing the headlights with soap and water to remove dirt and grime, then dry with a microfiber cloth. This step is crucial; just like a mechanic cleaning a carburetor before tuning, a clean surface ensures the abrasive works effectively. I once skipped this step and ended up just rubbing dirt around, which made the haze worse.
Apply Toothpaste as a Buffer
Squeeze a generous amount of toothpaste onto the headlight surface. Use a damp microfiber cloth to spread it evenly, then buff using circular motions for about two minutes. Imagine polishing a rough gemstone; the pressure and circular motion help remove the yellowed layer. I recall my first attempt was messy—pasting toothpaste everywhere—but then I realized using a smaller amount and consistent pressure gave better results.
Use Baking Soda for Extra Abrasion
Mix baking soda with a little water to create a paste, then apply it over the toothpaste layer. This combination boosts the abrasive effect. Think of it as adding grit to sandpaper for a smoother finish. During my trial, I noticed that after applying baking soda, the headlights looked visibly clearer; however, I also learned not to scrub too hard to avoid damaging the plastic.
Rinse and Inspect
Spray water on the headlight to rinse off the residue and wipe dry. Check the clarity; if still hazy, repeat the process. Remember, patience is key—like restoring an old photo, multiple gentle passes yield the best results. Once done, you’ll notice a marked improvement, almost like awakening a tired eye.
Protect Your Headlights from Further Damage
To prolong the clarity, apply a thin layer of car wax or a UV-protectant. UV rays are the main culprit behind headlight fading, similar to how sunlight accelerates your skin’s aging. For an extra shield, consider using a clear headlight sealant. I once accidentally used tire shine on mine, which initially made them look glossy but turned yellow faster—lessons learned.
Perform this maintenance every 6 to 12 months depending on exposure. Regular upkeep can save you from costly replacements, and it’s a lot cheaper than consulting a professional or buying costly kits. This DIY approach not only restores visibility but also revitalizes your car’s appearance—making your driveway feel a little more like a showroom.
Many car owners believe that auto repair is straightforward—a simple matter of replacing parts when something breaks. However, this misconception often leads to unnecessary expenses and overlooked issues. One common myth is that *more expensive* repairs always mean better results. In my experience, many high-cost fixes are unnecessary when simpler diagnostics reveal the true problem, such as a failing sensor or clogged fluid passage. For instance, a misdiagnosed transmission issue might be a minor solenoid defect rather than a full rebuild, saving you thousands.
Why Do Drivers Fall for Overcomplicated Repairs?
One trap I see often is the assumption that complex problems require complex solutions, which isn’t always true. A perfect example is brake service. Many assume that replacing brake pads alone fixes pedal pulsation, but the real culprit might be warped rotors or a failing master cylinder—a silent killer that can cause dangerous brake failure if neglected. As explained on RepairMyCarPro, symptoms like brake pedal pulsation often originate from rotor issues, not pad wear alone, and ignoring this can lead to more extensive damage or even brake failure.
Advanced Tip: Don’t Overlook the Simple Sensors
In diagnostics, sensors play a critical role. A small, overlooked sensor like the crankshaft position sensor can cause engine stalling or misfires without triggering a warning light. Recognizing the nuances in sensor behavior can save you from costly repairs. When in doubt, a thorough scan using an advanced diagnostic tool can pinpoint these hidden faults. Experts warn that ignoring subtle sensor faults can deteriorate engine performance over time, making it vital to understand these quiet contributors to your car’s health.
Another mistake is using generic oil changes as a one-size-fits-all solution. Modern engines require specific oil weights and quality grades; using the wrong type reduces efficiency and shortens engine life. For high-mileage vehicles, selecting the right oil, like those explained in detail in our oils guide, can prevent leaks and improve performance.
In essence, understanding your vehicle’s true needs—not just following popular myths or shortcut repairs—can extend your car’s life and safety. Remember to consult trusted sources or professional advice for complex diagnostics instead of opting for quick fixes. For example, if your car experiences irregular pulling, it might be a misaligned wheel or uneven tire wear—more nuanced than just a simple wheel alignment. You can learn more about diagnosing such issues on RepairMyCarPro, where expert insights cut through common misconceptions.
Have you ever fallen into this trap? Let me know in the comments. Keep questioning assumptions and investing in proper diagnostics—your vehicle and wallet will thank you.Maintaining your vehicle’s health over time requires more than just a few spare parts and quick fixes. Investing in high-quality tools and adopting systematic practices can make your auto repair routine more efficient and cost-effective. One essential equipment I rely on is an advanced automotive diagnostic scanner, like the Autel MaxiScan MS300, which offers comprehensive readouts of error codes, helping me identify underlying issues before they escalate. This tool doesn’t just tell you what’s wrong; it guides you toward precise repairs, saving time and money.
Another invaluable asset is a reliable torque wrench, such as the Tekton 1/2 Inch Drive Adjustable Torque Wrench. Proper torque application ensures that critical components like wheel lug nuts and brake calipers are tightened to manufacturer specifications, preventing uneven wear or failure. I personally prefer a digital torque wrench because it provides exact measurements and makes calibration straightforward, reducing the chance of over-tightening or under-tightening.
When it comes to fluid changes, using high-quality, manufacturer-recommended oils and additives is vital. For older engines, I recommend using oils formulated for high mileage, like the options discussed in our guide on [the oil weight secret for older engines](https://repairmycarpro.com/the-oil-weight-secret-for-older-engines-with-high-mileage). These lubricants help reduce oil consumption and extend engine life, especially when combined with a good oil filter and regular changes.
Maintaining your vehicle’s electrical system is equally crucial. I swear by a digital multimeter, like the Fluke 115, for diagnosing issues ranging from battery health to sensor faults. Unlike basic models, a Fluke multimeter provides true RMS readings, giving you accurate diagnostics even with complex electrical loads. This precision allows me to pinpoint problems like parasitic drains or faulty sensors swiftly, improving overall vehicle reliability.
Planning for long-term results means establishing a routine schedule. I set monthly inspection dates for essential components—brake pads, tire tread, fluid levels—to catch early signs of wear. Using a quality step ladder and good lighting makes inspections safer and more thorough. Additionally, employing a headlamp ensures I can see minor issues that might otherwise go unnoticed.
Looking ahead, the trend in auto maintenance is moving toward smart diagnostics integrated with mobile apps. Vehicles equipped with onboard sensors linked to cloud-based systems will provide real-time health reports, allowing owners to schedule repairs proactively. To stay ahead, I plan to invest in automotive OBD-II interfaces compatible with my smartphone, enabling remote monitoring of my car’s vital signs.
Wondering how to keep your brake system in top shape over time? Regularly inspecting and cleaning components like calipers and rotors can prevent costly repairs later. For a deep dive into diagnosing brake issues, check out [this detailed guide](https://repairmycarpro.com/why-your-brake-pedal-pulses-after-a-professional-rotor-resurface).
Finally, mastering the art of proactive maintenance involves using these tools consistently and correctly. I highly recommend trying out a professional-grade diagnostic scanner for your next check-up—your future self will thank you. Remember, the key to long-term vehicle health is patience and precision, backed by the right equipment and knowledge.
Lessons That Changed My Approach to Car Care
One of the most valuable lessons I learned was that patience often beats quick fixes. Rushing through repairs or relying solely on flashy tools can lead to unnecessary expenses and frustration. Instead, taking the time to understand the root cause—with simple diagnostics—created lasting results. Additionally, I realized that investing in basic equipment like a multimeter and torque wrench empowered me to handle most issues confidently and cost-effectively. Lastly, never underestimate the power of regular, preventive maintenance; small, consistent efforts saved me from tackling bigger problems later and kept my car running smoothly.
Tools, Reads, and Wisdom That Keep Me Ahead
For anyone serious about vehicle health, I recommend tools I personally trust: a reliable OBD-II scanner like the Autel MaxiScan MS300 provides instant insights into hidden problems. A digital multimeter such as the Fluke 115 helps me diagnose electrical issues accurately, saving time and guesswork. For understanding vehicle behavior and maintenance tips, books like “Automotive Repair for Dummies” or trusted online resources like RepairMyCarPro have become my go-to sources. These tools and resources demystify complex issues and help me make informed decisions, whether I’m fixing headlights or diagnosing a troublesome transmission.
Your Next Step in Car Care Empowerment
Remember, you don’t need to be a professional mechanic to keep your vehicle in top shape—just a curious mind and the right attitude. I encourage you to start small, invest in some basic tools, and explore DIY solutions like headlight restoration or fluid checks. Each self-made fix increases your confidence and saves you money, making the journey of auto maintenance both rewarding and empowering. Your car is an extension of you—giving it the care it deserves makes every drive safer and more enjoyable. So go ahead, take that first step today—your vehicle and wallet will thank you.