Have you ever been in the middle of an oil change, only to discover that one of your oil pan bolts has been stripped? I remember the sinking feeling in my stomach when I tried to tighten that stubborn bolt, and it just spun freely, refusing to tighten. It was late Saturday afternoon, my driveway was cluttered with tools, and I knew I couldn’t afford a costly tow or a mechanic visit. That moment was a real lightbulb for me—an urgent reminder that even small DIY mishaps can turn into big headaches if you’re not prepared.
Why Stripped Oil Pan Bolts Are More Common Than You Think
Stripped bolts happen more often than you’d expect—especially after multiple oil changes or if a bolt was overtightened in the past. When that bolt refuses to tighten, it creates a leak risk that can lead to engine damage if ignored. The good news? You don’t always need to call a tow or spend a fortune at the shop. With a few tricks up your sleeve, you can fix a stripped oil pan bolt right in your driveway. But first, let’s address a common question that many DIYers have: is this repair even worth the effort? Absolutely. Saving yourself the cost of a tow or a mechanic visit not only saves money but also boosts your confidence in handling small car issues. And remember, making mistakes early on is part of the learning process—like I did when I used the wrong size screwdriver, which only worsened the stripping. For more tips on avoiding such pitfalls, check out this article on common DIY mistakes.
Is Fixing a Stripped Bolt Really Doable Without a Professional?
Many newcomers worry that a stripped bolt is the end of the road—that they’ll have to shell out for a tow or replacement parts. I’ve been there, I get it. But learned through trial and error that patience and the right tools can make this a manageable task. Early on, I made the mistake of using a regular screwdriver instead of a proper bolt extractor, which only worsened the problem. Now, with a bit more experience, I can confidently say that most stripped bolts can be saved with simple, inexpensive tools—saving you time and money. We’ll walk through the steps to fix this issue effectively, so stay tuned. If you’re dealing with a stubborn bolt right now, know that this is a common challenge, and you’re not alone. Let’s dive into the proven steps that can help you fix your oil pan bolt without a tow, just like I did—and get you back on the road in no time.
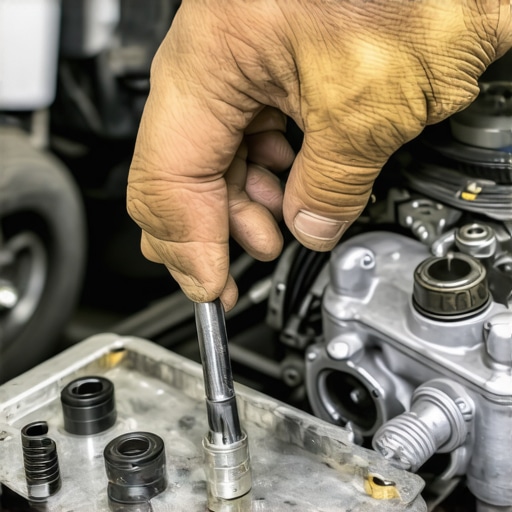
Gather the Right Tools and Prepare the Area
First, assemble essential tools: a bolt extractor kit, penetrating oil, a socket set, and possibly a drill. Put on safety glasses and gloves to protect yourself. Clear the workspace around the oil pan to give yourself room to work. I learned this the hard way when I didn’t prepare; spilled oil in my driveway made the process messier. Drip some penetrating oil onto the stripped bolt and let it sit for 10-15 minutes to loosen rust and debris, making extraction easier.
Drain the Oil and Access the Bolt
Drain the engine oil to prevent spills when removing the oil pan bolt. Use a wrench to remove the drain plug and catch the oil in a suitable container. Once drained, locate the stripped bolt on the oil pan. Depending on your vehicle, you might need to remove other components (like a skid plate) to access the bolt comfortably. Remember, patience here saves time—rushing can strip the bolt further or damage surrounding parts.
Remove the Stripped Bolt Carefully
Fit the appropriate size socket or extractor into the bolt head. For a severely stripped bolt, a bolt extractor tool designed for damaged fasteners works best. Gently turn counter-clockwise; if it slips, don’t force it. Apply more penetrating oil and wait again if needed. Once the bolt starts turning, slow and steady wins the race to prevent breaking the extractor tip or damaging the threads.
If the bolt spins freely without resistance,
try gripping it with pliers to unscrew it manually. Alternatively, drilling a small hole in the bolt head can allow you to use a screw extractor. I once drilled a tiny hole, inserted an extractor, and successfully removed the bolt—a technique worth mastering for stubborn cases.
Reinforce the Threaded Hole
After removing the bolt, inspect the threads for damage. If threads are stripped, insert a thread repair kit or use a Helicoil insert to restore the thread’s strength. This step is crucial; a damaged thread will cause leaks or future bolts to strip easily. During my own repair, using a Helicoil saved me from having to replace the entire oil pan, which would have been costly and time-consuming.
Install a New Bolt and Seal
Thread a new bolt with a bit of anti-seize compound to prevent future stripping. Tighten it to the manufacturer’s specified torque—over-tightening risks stripping again, while under-tightening can cause leaks. Refill the engine with oil, check for leaks, and ensure everything is secured. Once done, start the engine and monitor for any issues. Remember, a well-executed repair not only saves money but keeps your engine running smoothly.
 Many car enthusiasts and DIYers believe they understand vehicle diagnostics and repairs, but often, crucial nuances are overlooked, leading to costly mistakes. For example, a common myth is that a check engine light always indicates a critical issue requiring immediate professional intervention. In reality, modern vehicles have complex sensors and modules that can trigger warning lights for minor or transient issues, which might just need a simple reset or cleaning. Overlooking this can result in unnecessary repairs or replacements.
Why do some diagnostic codes mislead even experienced mechanics?
Expert insight shows that DTCs (Diagnostic Trouble Codes) are essential tools, but they don’t tell the full story. For instance, a code related to oxygen sensors might stem from a simple wiring issue rather than a faulty sensor itself. Technical studies highlight that interpreting diagnostic data requires understanding the vehicle’s entire electronic ecosystem, rather than just replacing parts based on codes. Misinterpretation can trigger unnecessary repairs, such as replacing a perfectly functional sensor—costing time and money. Additionally, many overlook the significance of correctly diagnosing brake issues. It’s tempting to think that squealing brakes are always due to worn-out pads, but often, inexpensive causes like cheap brake pads or contaminated rotors are at fault. Rushing into replacements without proper inspection can lead to premature wear or other problems. This is where advanced diagnostics and a keen eye for detail matter. Simple tests, like measuring rotor runout or inspecting caliper function, can save you from costly replacements. For oil changes, a common mistake is to underestimate the importance of oil quality and proper change intervals. Some rely on the 10,000-mile myth without considering driving conditions or oil type. High-mileage synthetic oils can cause leaks if not used properly, so understanding your specific vehicle and reading manufacturer guidelines is crucial. Neglecting this nuance often results in accelerated engine wear or leaks. Think you know everything about vehicle maintenance? Think again. Pay attention to the minor details and avoid the pitfalls that cost others dearly. Proper diagnostics aren’t just about reading codes—they’re about understanding your vehicle’s unique needs. Want to learn more? Check out this guide on transmission slipping signs or how pressure washing affects brake sensors. Remember, the devil is in the details, and mastering them can save you time, money, and frustration. Have you ever fallen into this trap? Let me know in the comments.
Investing in the Right Equipment for Reliable Diagnostics
Maintaining your vehicle over the years requires more than just basic tools; it demands precision equipment that can provide accurate data and durability. I personally recommend a quality OBD-II scanner like the Autel MaxiCOM MK808, which offers advanced diagnostics beyond generic code reading. Its ability to interpret complex engine, transmission, and ABS codes empowers DIY enthusiasts to identify issues before they escalate, saving both time and money. Additionally, a reliable digital multimeter with auto-ranging capabilities is indispensable for electrical troubleshooting— I’ve found that the Fluke 115 strikes the perfect balance between performance and affordability. These tools are investments in your vehicle’s longevity, helping you catch small problems early and avoid costly repairs later on.
Maintain Your Diagnostics System with Regular Software Updates
Just like your vehicle, your diagnostic tools need regular updates to stay effective. Firmware updates from manufacturers ensure compatibility with the latest vehicle models and diagnostic protocols. For instance, keeping your scanner’s software current allows you to interpret new codes accurately, especially as automakers introduce advanced safety systems and electronic controls. Set a reminder to check for updates quarterly; this proactive step keeps your diagnostic arsenal sharp and capable of tackling emerging issues.
Long-Term Benefits of Consistent Maintenance Routines
Sticking to scheduled maintenance, including oil changes with quality products like synthetic oils suited for your vehicle, is pivotal. Using proper tools and adhering to manufacturer guidelines ensures that each component functions optimally. For example, regular oil analysis— which you can perform with specialized kits— helps monitor engine wear particles and oil contamination levels, providing insight beyond simple mileage intervals.
Looking ahead, vehicle technology continues to evolve rapidly, with predictive maintenance becoming the norm. Intelligent sensors will alert you to issues before symptoms even appear, and diagnostic data will be stored and analyzed over time to identify patterns. Staying ahead of this curve means investing in capable tools now and developing habits that prioritize monitoring and early intervention.
How do I keep my vehicle diagnostics accurate over time?
One effective way is to integrate routine system calibration and software updates for your diagnostic equipment. Regularly check for firmware updates right after your vehicle’s maintenance schedule, ensuring your tools interpret data correctly. Moreover, maintaining clean connections and inspecting your scan tool’s cables and ports prevents false readings. For electrical troubleshooting, always verify your multimeter’s calibration— a simple step that can save you hours of troubleshooting. By sharpening your diagnostic skills and keeping your tools in top shape, you’ll reduce the risk of unexpected breakdowns and extend your vehicle’s operational life. For a deep dive into this approach, read this article on advanced vehicle diagnostics hacks. Next time you’re faced with a suspicious sensor or error code, try performing a thorough system check with your calibrated scanner and see the difference it makes.
Throughout my journey with vehicle maintenance, I’ve learned that patience and the right mindset are as crucial as the tools we use. One of my most enlightening experiences was tackling the dreaded stripped oil pan bolt, an issue that many DIYers face without knowing the intricacies involved. This challenge taught me that even seemingly minor problems can become opportunities to deepen our understanding and skills. Embracing these lessons empowers us to handle our vehicles confidently and save significantly on repairs and towing costs.
Hidden Traps That Trip Up DIY Oil Changes
I used to rush the process, tightening bolts without assessing their condition, which sometimes led to stripping. Over-tightening is a common mistake that can turn a simple oil change into a costly repair. Recognizing the importance of inspecting bolts beforehand and applying proper torque has made all the difference. Gaining knowledge from expert sources, like tutorials and trusted forums, helps avoid these pitfalls and keeps your maintenance routine smooth and effective.
Beyond the Basics: What I Wish I Knew Sooner
- Sometimes, a bolt isn’t just stuck; it’s damaged. Using the right tools, such as a bolt extractor kit, transformed my approach from frustration to success.
- Preparation is key. Draining the oil correctly and clearing the workspace saved me from a messy cleanup and potential injury.
- Thread repair deserves attention. Repair kits like Helicoils saved me from replacing the entire oil pan, making repairs more affordable and less invasive.
- Take your time with torque settings. Over-tightening or under-tightening can cause leaks or stripping; always refer to your vehicle’s specifications.
Upgraded Tools That Make a Difference
Investing in quality tools has been a game-changer. I trust a reliable torque wrench to ensure proper tightening, and a good set of extraction tools to handle stubborn bolts. These investments not only streamline repairs but also boost confidence during future maintenance tasks. Coupling these with proper safety gear and workspace organization makes the entire process safer and more efficient.
Remember, Every Repair Is a Step Forward
Handling a stripped oil pan bolt might seem daunting at first, but every challenge faced is a learning milestone. My advice? Embrace the process, stay curious, and don’t hesitate to seek out expert advice. Your vehicle can reward you with years of reliable service when you invest time and care into its maintenance. If you’re facing a similar issue now, take heart—this is a common hurdle, and with the right approach, you’ll conquer it just like I did. Ready to give it a try? Your car—and your confidence—will thank you.