Have you ever been sitting at a stoplight, foot on the brake, only for your engine to suddenly hesitate or even stall completely? That frustrating moment when your car loses power right when you need it most — it’s enough to make anyone wonder if their vehicle is about to give up on them. I remember the first time it happened to me; I was just trying to turn onto a busy street, and suddenly my engine sputtered like an exhausted runner. Panicked, I thought my car was dying, but eventually, I found out the real culprit was something surprisingly simple: a dirty sensor.
In today’s post, we’re going to uncover why that sensor dirtiness causes your car to stall at red lights and, more importantly, how you can fix it yourself. No more guessing, no more costly visits to the mechanic where they replace parts that didn’t need replacing. I’ve been down that road, and I know how exasperating it can be. But here’s the good news: with a little insight and some DIY know-how, you can get your vehicle running smoothly again.
Why Sensors Are the Unsung Heroes and Villains in Your Car’s Performance
Modern vehicles rely heavily on sensors to monitor and manage everything from fuel delivery to engine temperature. They act as your car’s nervous system, relaying critical information to the engine control unit (ECU). When these sensors are dirty or malfunctioning, they send incorrect signals, causing your car’s computer to make inappropriate adjustments. That miscommunication can result in engine hesitation, rough idling, or even stalling at red lights.
One common culprit is the mass airflow sensor (MAF), which measures the air entering your engine. If it’s coated with dirt or oil, it can misread airflow levels, leading the ECU to cut fuel or reduce power unnecessarily. Similarly, the oxygen sensors—or O2 sensors—monitor exhaust gases and help optimize combustion. Dirty sensors here can cause rough idling or stalling, especially when your engine is cold or under light throttle.
I used to dismiss these little sensors as a minor detail, but early on I made the mistake of ignoring engine warning lights or洗ign my sensors with harsh cleaners that did more harm than good. Trust me, a quick, proper cleaning can save you a ton on repairs and prevent those embarrassing stalls. If you’re curious, I recommend checking out this handy guide to diagnose vacuum leaks that often go hand-in-hand with sensor issues, [The 5-Minute Trick to Find a Vacuum Leak with Soapy Water](https://repairmycarpro.com/the-5-minute-trick-to-find-a-vacuum-leak-with-soapy-water). It’s a simple start to understanding how small leaks or dirt can disrupt your engine’s harmony.
Have you faced weird stalls or rough idling at red lights? If so, you’re not alone. Many drivers overlook the power of a clean sensor, thinking it’s too technical or not worth their effort. But as I discovered early on, sometimes the solution is right in front of you — just hidden beneath layers of grime.
Now that we know why sensors matter and how dirt can trick your engine into thinking conditions are different, let’s move on to actually fixing the problem. It’s easier than you might think, and I’ll guide you through the process to get your engine purring again.
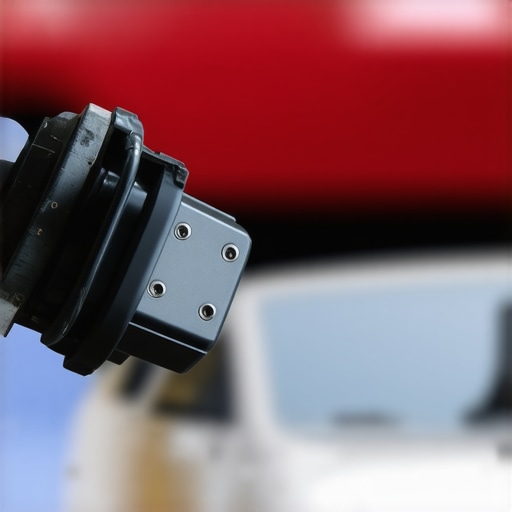
Disconnect and Locate the Sensors
Start by turning off your vehicle and disconnecting the negative battery terminal to ensure safety. Locate the sensors—commonly the mass airflow sensor (MAF) or oxygen sensors (O2 sensors). Consult your vehicle’s manual or look for wiring connectors attached to small, cylindrical or rectangular units within the air intake or exhaust system.
Remove the Sensor Carefully
Using appropriate tools, gently detach the sensor from its mount. Think of it like removing a delicate ornament—you don’t want to break the clip or bend the sensor. Do not apply excessive force; if it doesn’t come loose, recheck for hidden clips.
Clean the Sensor with a Specialized Cleaner
Spray a dedicated sensor cleaner or carburetor cleaner onto the sensor’s electrical parts and the sensing elements. Avoid using harsh brushes or abrasive materials—it’s like cleaning a camera lens; gentle is better. I once used brake cleaner by mistake, which damaged the sensor, so stick to approved cleaners. Make sure the sensor is dry before reinstalling.
Avoid Contaminating the Sensor
Keep your hands and tools free of grease or oil. Contaminants can cause the sensor to give false readings even after cleaning. Wearing nitrile gloves helps prevent oils from transferring.
Reinstall and Test
Once cleaned, reattach the sensor securely, ensuring all clips and connectors are properly engaged. Reconnect the negative battery terminal. Start the vehicle and observe if the engine idles smoothly. If stalls persist, further diagnosis may be necessary, but often, a clean sensor resolves the issue quickly.
Perform a Sensor Check if Problems Continue
If cleaning doesn’t solve the stall issue, consider checking the sensor’s voltage output or connecting an OBD-II scanner to identify error codes. For a quick DIY tip, you can check the sensor’s activity with a multimeter or try this trick to find vacuum leaks [The 5-Minute Trick to Find a Vacuum Leak with Soapy Water](https://repairmycarpro.com/the-5-minute-trick-to-find-a-vacuum-leak-with-soapy-water). Persistent errors may indicate a faulty sensor needing replacement.
 }**Note:** For a comprehensive diagnosis of sensor-related issues, review this guide on vehicle diagnostics hacks [3 Vehicle Diagnostics Hacks for 2026 TPMS Sensor Errors](https://repairmycarpro.com/3-vehicle-diagnostics-hacks-for-2026-tpms-sensor-errors). Keep your sensors clean and your engine will thank you—stall-free starts are just a cleaning away.Many car owners operate under the assumption that DIY repairs and diagnostics are straightforward and risk-free, but in reality, there’s a lot more nuance involved. One popular myth is that resetting the check engine light by disconnecting the battery is a permanent fix. In my experience, this only clears the warning temporarily; the underlying issue remains, and ignoring it can lead to more severe damage or safety risks. Instead, using proper diagnostic tools or professional guidance ensures you’re addressing root causes effectively.
Another misunderstood aspect revolves around oil changes. Many believe that following the traditional 3,000-mile rule is necessary for modern engines. However, according to automotive expert insights, advanced synthetic oils and modern engine designs have shifted that interval significantly—some vehicles can go 7,500 to 10,000 miles between changes. Relying on outdated advice can cause unnecessary service visits and waste, making it essential to understand your specific vehicle’s needs.
When it comes to brake service, a common mistake is neglecting to inspect brake hoses and hardware thoroughly. People often think that the rotors and pads are the only components worn out, but rubber hoses can deteriorate internally, leading to spongy brakes or even failure. Over-tightening brake calipers, for instance, can cause uneven wear or warping, which many technicians might overlook if they’re focusing only on the visible parts. For a deeper understanding, check out our article on avoiding costly brake mistakes.
A nuanced but critical detail is that engine sensors can fail in silent ways, sending false signals to your ECU. Many think replacing a sensor immediately when a warning appears is necessary, but sometimes, cleaning or testing the sensor can restore proper function. For example, dirt and oil can cause sensors like the MAF or O2 sensors to provide inaccurate readings without outright failure. A misdiagnosis can lead to unnecessary replacements. To uncover hidden sensor issues, consider diagnostic hacks such as the soap water leak test—learn how this simple trick can save you money.
Advanced car diagnostics often involve interpreting error codes properly. A common mistake is to assume a code indicates a single problem, but many codes are symptoms of more complex issues. For example, a P0171 code might seem to point to a vacuum leak, but it could also be due to a faulty sensor or fuel system problem. Diversifying your understanding of error codes helps prevent chasing phantom problems and enhances repair accuracy. For detailed techniques, explore our guide on vehicle diagnostics hacks.
Ultimately, mastering these nuanced aspects prevents costly trial-and-error repairs. Remember, properly diagnosing vehicle issues requires patience and knowledge—don’t let myths lead you astray. Have you ever fallen into this trap? Let me know in the comments.
Gear Up for Long-Term Vehicle Care
Maintaining your car’s health isn’t just about occasional checks; it’s about having the right tools and an effective routine. As an enthusiast who values precision, I rely on specific diagnostic equipment like the OBD-II scanner, which I personally use to decode error codes quickly. A top choice is the BlueDriver Bluetooth Scan Tool, known for its comprehensive reports and compatibility with smartphones. It connects effortlessly, providing real-time data that helps me identify issues before they escalate.
Beyond diagnostic devices, I recommend investing in quality cleaning supplies like a sensor-specific cleaner to ensure your sensors stay free of dirt and oil — this avoids false readings that can lead to rough idling or engine stalls. Remember, the simple trick with soapy water can help spot vacuum leaks that might otherwise complicate your diagnostics.
Embrace Routine Checks and Preventive Maintenance
Developing a habit of regular inspections—such as checking belts, hoses, and fluid levels—can save you from unexpected breakdowns. For example, inspecting your serpentine belt with a few drops of water at high-mileage intervals can reveal cracks or glazing early, preventing roadside failures. I personally do this every 10,000 miles, which keeps my engine running smoothly.
Using a torque wrench for tightening bolts during oil changes or brake repairs ensures proper tension, preventing parts from loosening or overtightening. This practice extends to checking your brake hoses; I avoid replacing calipers prematurely by verifying the condition of rubber hoses—often, a simple replacement of worn hoses stops the cycle of unnecessary repairs.
Plan for Future Trends
Technology advances mean that more cars are integrating smart diagnostics and remote monitoring. I predict that in the next few years, OBD-II scanners with AI-powered analysis will become standard, making maintenance more accessible to everyday drivers. Staying ahead involves adopting tools like the latest mobile apps that sync with your vehicle, alerting you early to potential issues.
How do I maintain my vehicle’s systems over time?
The key is consistent monitoring using reliable tools, timely fluid changes, and staying informed about your specific model’s requirements. Incorporating routine checks with trusted equipment ensures long-lasting performance and safety. If you haven’t yet, try the soap water leak detection trick to identify tiny vacuum leaks—it’s a game-changer for early diagnostics and keeps your vehicle performing optimally.

The Hardest Lesson I Learned About vehicle diagnostics,oil change,auto repair,brake service
One of my biggest realizations was how overlooked cleanliness and proper diagnosis can prevent costly repairs. Dirty sensors don’t just cause stalls—they silently compromise your engine’s health. I used to chase after expensive parts, but now I focus on simple, effective diagnostics like the soap water leak trick, which you can learn about here. This approach saved me from unnecessary replacements and gave me peace of mind.
What I Would Do Differently About Vehicle Repairs and Maintenance
In hindsight, I wish I had trusted my senses and tools more. Regularly checking sensor cleanliness and understanding error codes prevented many stalls. Also, I’ve learned that preventive maintenance like inspecting hoses and using quality diagnostic tools is far more effective than reactive fixes. For instance, a simple hose check before a long trip can save hours of troubleshooting, which I now do using insights from trusted sources—or my own experience.
My Go-To Resources for Staying Ahead
- BlueDriver Bluetooth Scan Tool: Reliable and user-friendly, I rely on it for quick diagnostics. It helps me interpret error codes without needing a mechanic’s help, making DIY repairs more accessible.
- Sensor-Specific Cleaners: Using approved cleaning products has made a huge difference. I trust brands recommended by fellow enthusiasts because they’re proven to preserve sensor precision.
- Repair Guides and Hack Articles: Articles like this leak detection trick are invaluable for practical troubleshooting. They enable me to fix minor issues without costly professional assistance.
You’re Capable of Keeping Your Vehicle Running Smoothly
Taking control of your vehicle’s health is empowering. Remember, small steps like cleaning sensors, checking hoses, and interpreting error codes can have a profound impact on performance and safety. Don’t wait for a breakdown—use your knowledge and tools to ensure your ride stays reliable. Have you tried any DIY diagnostic tricks lately? Share your experiences below—I’d love to hear which hacks made a difference for you.