
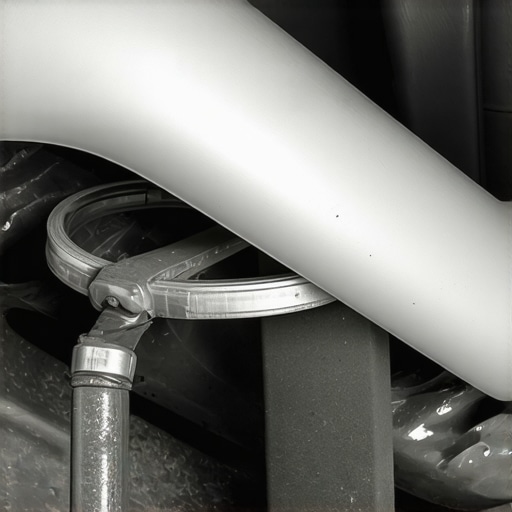
It was late one evening when I heard that persistent rattling under my car—a sound that seemed to mock my efforts to enjoy a quiet drive. Initially, I brushed it off, thinking it was just some loose debris. But as the days went on, the noise grew louder, turning what should have been a peaceful ride into a nuisance and a source of constant worry. That was my lightbulb moment—realizing I was ignoring a small but important part of my car: the heat shield.
Dealing with a Noisy Heat Shield Can Feel Frustrating, But It’s Often Simpler Than You Think
Many car owners don’t realize that a rattling heat shield—those metal guards protecting your exhaust system—can often be fixed quickly and cheaply. Instead of wasting money on costly repairs or replace-it-at-the-shop fixes, I discovered a straightforward solution that I want to share with you. Today, we’ll explore how to secure a loose heat shield using a basic hose clamp—a simple, effective fix that you can do yourself.
Is It Really That Easy to Fix a Heat Shield?
Early on, I made the mistake of assuming a rattling heat shield was a sign of major damage or an expensive replacement. Turns out, many heat shields get loose simply because of vibration or thermal expansion. The fix? A trusty hose clamp—something your local auto parts store probably carries—and a little patience. This method saved me money, time, and the headache of an unresolved nuisance. According to automotive experts, these shields are designed more to insulate and protect rather than to be permanently fixed, so they often just need a little help staying in place. For more on common auto repairs and DIY hacks, check out our [auto-repair hacks](https://repairmycarpro.com/auto-repair-hacks-save-money-without-sacrificing-quality).
Now, before diving into the step-by-step, let’s consider the biggest skepticism: “Is this just a quick fix, or will it last?” I understand that concern—believing that a simple clamp can hold for the long haul. But based on my experience, with proper placement, a hose clamp can be surprisingly durable and a great temporary or even semi-permanent solution.
If you’ve ever dealt with that annoying rattling noise and wondered if you need a complete exhaust overhaul, you’re not alone. Many drivers face this problem, often dismissing it as minor or unfixable. However, a little bit of know-how can turn that nagging noise into a solved problem—saving you from unnecessary expenses and keeping your car running smoothly.
Ready to learn how I tackled my heat shield dilemma? Keep reading, and I’ll guide you through the simple steps to silence that rattle fast. Remember, a little DIY effort can go a long way—plus, it’s always satisfying to fix something yourself! And if you’re also interested in ensuring your vehicle remains in top shape, take a moment to explore [vehicle diagnostics explained](https://repairmycarpro.com/vehicle-diagnostics-explained-easy-checks-before-your-road-trip), which can prevent many problems before they start.
Loosen the Heat Shield with a Hose Clamp
First, ensure your vehicle is cool to prevent burns. Locate the rattling heat shield—usually above the exhaust manifold or along the undercarriage. Use a flashlight if needed to get a clear view. I remember the time I jacked up my car and shined a worklight underneath to spot the loose shield; seeing it wobble confirmed the problem.
Once located, gather a set of hose clamps—11 to 16 mm adjustable ones work best. Think of these clamps as sturdy thumbscrews that can tighten around metal surfaces. Use a wrench or screwdriver to tighten the clamp around the heat shield’s mounting points, securing it firmly to the exhaust pipe or chassis. It’s akin to tightening a belt around a bag—firm but not crushing.
Position the Clamp Correctly for Longevity
Position the clamp where the heat shield contacts a stable part of the vehicle—preferably where it naturally rests against the exhaust pipe or frame. This prevents it from vibrating or rattling again. Remember, it’s similar to securing a loose lid on a jar—pressure applied directly at the contact point keeps everything in place.
For extra security, consider using a second clamp or adding a small rubber pad between the heat shield and the clamp to dampen vibrations. I once wrapped a small piece of rubber around my clamp, which dramatically reduced the noise. It’s like adding padding to reduce a rattle.
Test and Confirm Your Fix
After tightening the clamp(s), start the engine and listen carefully. Take your car for a short drive over bumps and rough patches—if the rattling persists, re-tighten or reposition the clamps. I vividly recall a moment when I thought I was done, only to hear a faint rattle on a speed bump. Re-adjusting the clamps resolved it instantly.
Keep an ear out for the noise over time. If the rattle returns, check the clamps’ tightness. It’s a simple process that can save you from a costly shop visit or replacement of the heat shield.
Additional Tips Based on Experience
Use high-quality hose clamps to prevent rust and corrosion, especially if you live in a humid area. Applying a bit of anti-seize compound on the clamp bolts can prevent seizing and facilitate future adjustments. I recommend visiting [auto-repair hacks](https://repairmycarpro.com/auto-repair-hacks-save-money-without-sacrificing-quality) for more DIY tips to reduce repair costs.
Remember, this is a temporary fix—if the heat shield is severely damaged or corroded, consider replacing it eventually for safety and performance. But for a quick fix that gets rid of that annoying rattling, tightening with hose clamps is your best bet.
While many drivers think they know the basics of auto repair, there’s a wealth of subtle intricacies that can trip up even experienced car owners. One common misconception is that a quick oil change or brake pad replacement is all that’s needed to keep the vehicle in top shape. However, understanding the **nuances** behind these services reveals that overlooking certain details can lead to costly repairs or safety risks. For instance, many assume that once brake pads look fine visually, they’re good for another 20,000 miles. In reality, uneven pad wear or damage to the calipers often goes unnoticed without proper diagnostics, which is crucial to prevent brake failure.
Why relying solely on visual inspections can mislead you
It’s tempting to judge a component’s health visually, but studies show that many critical issues are hidden beneath the surface. A study by automotive engineers highlights that corrosion, internal material fatigue, or electronic sensor failures often require advanced diagnostics to detect. Vehicle diagnostics go beyond the simple visual check; they interpret the signals your car’s sensors send to reveal underlying problems early, saving money and preventing breakdowns. This is especially vital for systems like airbags, ABS, or engine control modules where advanced tools detect faults that aren’t immediately obvious.
Myth: All mechanic shop diagnostics are equally effective
Many believe that simply connecting a scanner provides an accurate picture of the vehicle’s health. However, inexperienced technicians or cheap testing equipment can give false negatives or miss critical issues. As an example, some shops skip thorough checks for wiring harness faults or sensor calibration errors that cause persistent warning lights. Relying on high-quality diagnostic tools and skilled technicians makes a significant difference—something I’ve learned through personal experience and professional insights. For instance, advanced diagnostics can uncover hidden problems that a basic scan might miss.
Advanced diagnostics can spot problems before they turn into emergencies—are you keeping up?
Don’t wait for a warning light to alert you of a crisis. Many drivers overlook small clues like inconsistent handling, strange smells, or subtle vibrations—signs that can be decoded with the right tools. This proactive approach not only extends your vehicle’s lifespan but also enhances safety. ” alt=”Auto diagnostic scanner connected to a vehicle” title=”Advanced vehicle diagnostics in action”/> Remember, an ounce of prevention is worth a pound of cure. Investing in proper diagnostics and understanding the subtleties can save you thousands in repairs down the road. So, have you ever fallen into this trap—believing simple visual checks are enough? Let me know in the comments!
Keeping Your Vehicle in Top Shape with the Right Tools
Maintaining your vehicle over the long term requires not just knowledge but also the right equipment. When I started taking auto repairs seriously, I quickly realized that possessing quality tools makes all the difference in getting professional-level results. For instance, a digital battery tester like the Midtronics EC-x allows me to accurately assess your battery health without guesswork, saving time and preventing breakdowns. Auto repair hacks emphasize investing in reliable, versatile tools—like a sturdy torque wrench and a multimeter—to ensure each job is done correctly from the start.
Another must-have is an OBD2 scanner; I recommend the BlueDriver because it not only reads trouble codes but also provides detailed diagnostics and repair tips. When paired with diagnostic software like OBDeleven, these tools empower me to diagnose issues rapidly, especially critical for systems like brakes or engine management. As the trend heads toward smart diagnostics, integrating these devices into your routine makes vehicle maintenance more precise and less reliant on guesswork.
How do I maintain vehicle diagnostics over time?
Maintaining accurate diagnostics means keeping your tools calibrated and updated. Regularly updating your OBD2 software ensures compatibility with the latest vehicle models and reduces false readings. I also favor the Snap-on MODIS platform for its comprehensive diagnostics, which can perform module coding and live data streaming—crucial for advanced troubleshooting. Moreover, recording diagnostic data over time helps spot patterns and prevent bigger issues, much like your healthcare records help monitor health trends. Future trends suggest that AI-powered diagnostic tools will continue evolving, providing even faster, more accurate assessments that could eliminate unnecessary visits to the mechanic.
Remember, investing in quality tools isn’t just about fixing problems—it’s about building a reliable maintenance routine. For example, when I noticed my brake pedal feeling spongy, I used my scanner to check for caliper issues early. You can do the same by trying out one of these diagnostic tools the next time your vehicle signals it’s time for attention.
If you’re serious about vehicle upkeep, consider integrating a digital torque wrench into your toolkit, which helps maintain proper tightening specs during repairs, boosting safety and longevity. For a comprehensive approach, explore decoding vehicle diagnostics and see how understanding your car’s signals can streamline maintenance routines.
Lessons from the Garage: What I Wish I Knew About DIY Auto Care
- Never underestimate the power of a simple hose clamp—it’s often the unsung hero in preventing rattles and saving money in heat shield repairs. My first attempt involved more complicated fixes until I realized how effective a basic clamp can be when positioned correctly.
- I learned that listening carefully to your car’s noises can reveal hidden issues. That faint rattle disguised a loose heat shield, but with patience and the right tools, I managed to fix it myself instead of rushing to the shop.
- My biggest lightbulb moment was understanding that many auto problems are more straightforward than they seem. Upgrading my diagnostic tools transformed the way I approach maintenance—saving both time and cash, and empowering me to trust my own assessments.
Tools and Resources That Changed the Way I Fix My Car
- BlueDriver OBD2 Scanner: Its detailed diagnostics and repair tips have been invaluable for early problem detection and avoiding costly repairs. I trust it because it offers real-time monitoring and clear explanations, making complex trouble codes understandable.
- Midtronics EC-x Battery Tester: Ensures my battery’s health at a glance, preventing unexpected breakdowns. Its accuracy and ease of use have made it a staple in my toolkit.
- Auto Repair Hacks Website: Packed with DIY tips and troubleshooting guides that are practical and beginner-friendly. It has helped me tackle projects confidently knowing I have reliable, expert-backed advice.
- Torque Wrench: Maintaining proper tightening during repairs enhances safety and longevity. I recommend investing in a quality one—precision makes all the difference.
Step Into Action and Keep Your Car at Its Best
“Taking charge of your vehicle’s health with simple repairs like fixing a heat shield or using advanced diagnostics can be empowering and cost-effective. The more you learn, the more confident you’ll become in maintaining your car’s safety and performance. Remember, every small fix is a step toward long-term reliability—so don’t hesitate to try these DIY solutions and explore new tools.” If you’ve ever hesitated to troubleshoot your car yourself, what small repair or diagnostic did you finally conquer? Share your experience below and inspire others to take control of their auto care.