I remember the first time my car refused to start on a cold winter morning. Everything seemed fine the night before — no warning lights, no strange noises. But when I turned the key, all I got was a weak click and a dead silence. It was frustrating, confusing, and honestly a little embarrassing. Turns out, that familiar clicking sound wasn’t some complex engine failure; it was my battery terminals being loose. That lightbulb moment made me realize how often a tiny, overlooked issue can cause big trouble.
Why Checking Your Battery Terminals Might Save You a Tow
Most drivers assume a no-start condition stems from a dead battery or a failing starter. But (believe it or not) one of the most common culprits is a loose connection at the battery terminals. When these terminals aren’t snug, it creates a poor electrical connection, leading to unreliable starts or even complete failure to crank over. The good news? It’s a quick fix! Many times, tightening or cleaning your battery terminals can restore your vehicle’s ability to start smoothly, saving you time, money, and the frustration of being stranded.
Could a Loose Terminal Really Be the Cause?
Absolutely. I made the mistake early on of assuming my battery was dead — only to find out that all I needed was to re-tighten the terminals. I’ve since learned that corrosion and loose connections are responsible for a significant percentage of no-start issues. As pointed out by automotive experts, ensuring your battery terminals are clean and tight is one of the simplest ways to keep your vehicle reliable. It’s such a common problem that I recommend everyone check their terminals regularly, especially before extreme weather or long trips. Want to learn how to do it correctly? Check out this helpful guide on maintaining battery connections.
Now, if you’ve experienced a stubborn starting problem, don’t just dismiss it as a dead battery or a starter issue. Often, a simple inspection of your battery terminals can reveal the real culprit. And trust me, preventing this minor issue from turning into a tow or costly repair is worth a few minutes of your time.
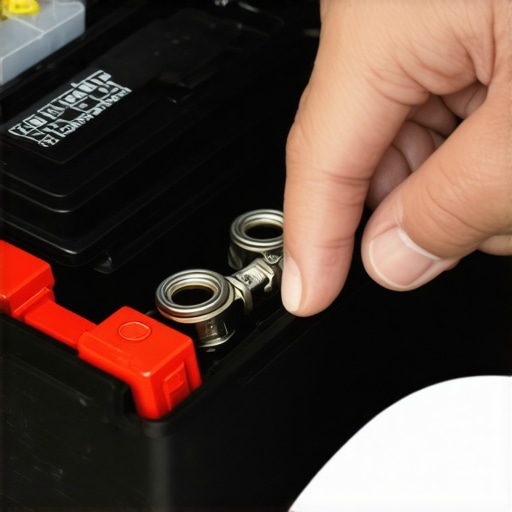
Locate Your Battery and Prepare for Inspection
Begin by opening your vehicle’s hood and locating the battery, usually positioned on the engine bay’s side. Use gloves and safety glasses to protect yourself from acid leaks and sparks. Ensure the engine is off and the keys are removed to prevent electrical hazards. Clearing the area around the terminals makes handling easier and reduces the risk of accidental shorts.
Identify the Terminals and Look for Signs of Corrosion
Identify the positive (red) and negative (black) terminals. Check for any corrosion, which appears as a white, powdery substance, or greenish deposits. Micro-level corrosion can impede electrical flow even if the terminals look otherwise tight. Visual cues are critical; do not proceed until you’ve inspected both sides carefully.
Disconnect the Battery Cables Properly
Using a wrench, loosen the nut securing the negative terminal first. Gently lift the cable off and set it aside, ensuring it doesn’t interfere with other engine parts. Repeat this process with the positive terminal. Remember, disconnecting the negative first prevents accidental short circuits if the wrench contacts grounded metal. This step is vital for safety and avoids damage to the vehicle’s electrical system.
Clean and Inspect the Terminals
Remove any corrosion using a wire brush or a mixture of baking soda and water applied with an old toothbrush. Scrub until the terminals are shiny and free of debris. Inspect for physical damage like cracks or significant wear. After cleaning, dry the terminals thoroughly; moisture can cause further corrosion or electrical resistance. Proper cleaning extends the lifespan of your battery and ensures reliable connection.
Reattach the Cables Correctly and Tighten
Connect the positive cable to the positive terminal first, then secure the nut tightly with a wrench—**but not over-tighten**, as this can damage the terminal or cause cracking. Repeat with the negative cable. Hand-tighten initially, then give a quarter turn with the wrench to secure snugness. A firm, snug connection is crucial; loose terminals are a common cause of car starting issues.
How Tight Is Too Tight? Avoid Over-tightening
Over-tightening can strip the terminal threads or crack the plastic insulator, leading to future failure. A good rule of thumb: tighten until the nut is snug and resistant to turning by hand, then give it an additional quarter turn. Think of it as tightening a jar lid—firm but not crushing the glass. For a visual reference, this lugar removal guide offers helpful tips for similar tasks.
Test Your Connection with a Quick Start
Once everything is reassembled, close the hood and attempt to start the vehicle. Listen for a smooth engine crank. If the car starts without hesitation and the dashboard indicators are normal, you’ve successfully secured the battery terminals. Persistent issues might suggest a deeper electrical fault or a failing component like the alternator, which can be diagnosed using specific tests found here.
By following these precise steps, you will prevent the common frustration of a car that refuses to start due to loose or corroded terminals, saving you time and money while keeping your vehicle reliable.
The Myth of the One-Size-Fits-All Oil for Every Engine
Many assume that sticking to the manufacturer’s recommended oil type and change interval suffices for all vehicles. However, this overlooks essential nuances like engine design and operating conditions. For older engines, especially those with high mileage, switching to a different oil weight—like a heavier grade—can reduce leaks and consumption, as discussed here. Neglecting these specifics can accelerate wear or cause poor lubrication, leading to premature engine failure.
Advanced Mistake: Overlooking the Role of Proper Diagnostics
One prevalent trap in auto repair is misdiagnosing issues based solely on symptoms. For example, a vehicle pulling to one side might be attributed to tire imbalance, but the root cause often lies elsewhere—like uneven brake caliper drag or suspension misalignment. Relying on quick visual inspections without proper diagnostics can lead to unnecessary parts replacement and increased costs. Investing in comprehensive vehicle diagnostics ensures accurate repairs and extends your vehicle’s lifespan. Learn how to spot a failing alternator early, here.
Common Misconceptions About Brake Service
Many think that squealing brakes always mean worn-out pads needing replacement. While sometimes true, it’s frequently caused by dust, rust, or a glazed pad surface. Moreover, some believe that replacing brake pads alone suffices, but issues like uneven rotor wear or caliper malfunctions can compromise safety. The subtlety is that a hard brake pedal even when the engine is off might hide problems within the master cylinder or brake fluid quality, detailed here. Recognizing these nuances prevents catastrophic failures and costly repairs.
Unseen Complexity of Vehicle Diagnostics
Vehicle diagnostics might seem straightforward—plug in a scanner, read codes, and fix. But the impressively nuanced part is interpreting these codes within the context of vehicle history and symptoms. For example, a misfire might be caused by a failing fuel injector, worn spark plugs, or even a vacuum leak, which can easily be overlooked here. Advanced technicians consider factors like recent repairs or environmental conditions, which can influence the diagnosis. This layered understanding often spells the difference between a quick fix and repeated, unnecessary visits.
In summary, shedding light on these often-misunderstood nuances helps us approach auto repairs with informed confidence. Recognizing the specific needs of your vehicle rather than relying on generic advice saves money and extends its life. Have you ever fallen into this trap? Let me know in the comments.
Invest Wisely in Tools for Long-Term Performance
Having the right equipment is crucial for effective auto repair and maintenance. I personally swear by a high-quality digital multimeter, like the Fluke 115, for diagnosing electrical issues such as faulty alternators or parasitic drains. Its accuracy and durability make it worth the investment, especially when diagnosing complex problems here. For tasks like checking for vacuum leaks, a smoke machine has become indispensable in my toolkit, providing clear visualization of leaks that are otherwise hard to detect. When it comes to brake service, a good caliper piston tool simplifies the process and prevents damage, saving hours of frustration compared to generic pliers.
Leverage Software for Precision Diagnostics
Modern vehicles depend heavily on electronic systems, making diagnostic software essential. I recommend using the Snap-on Verus Pro scanner—it’s robust and provides comprehensive data retrieval, live data streams, and capable troubleshooting support. This tool helps me identify issues like misfiring cylinders or sensor faults quickly, which in turn reduces unnecessary part replacements. It’s tempting to rely on basic OBD-II scanners, but investing in a professional-grade device pays off by uncovering hidden issues early, extending your vehicle’s lifespan. For example, spot signs of a dying alternator before it fails completely, as discussed here.
Implement Routine Maintenance Habits to Keep Vehicles Running
Beyond tools and diagnostics, establishing a maintenance schedule tailored to your car’s needs is vital. Regularly inspecting and cleaning battery terminals, as detailed here, prevents many starting issues. Checking fluid levels, ensuring proper tire pressure, and inspecting brake components every few thousand miles can save you from costly repairs down the line. As vehicles become more sophisticated, understanding and implementing these small but critical steps ensure long-term reliability and safety.
How do I maintain my vehicle’s performance over the years?
Consistency is key. Use quality parts, follow manufacturer-recommended service intervals, and keep a detailed maintenance log. Upgrading your tools, like adding a cordless impact wrench, can streamline tasks such as tire rotation or brake caliper replacement, making maintenance less of a chore and more of a routine. As technology evolves, so will the tools and techniques, emphasizing the importance of staying informed with the latest industry practices.
If you’re ready to make a real difference in your vehicle maintenance routine, try calibrating your multimeter with a known voltage source tonight. It’s a simple step that boosts confidence when diagnosing electrical issues and helps prevent guesswork. Don’t forget, investing in reliable tools now means fewer headaches later, so review your toolkit and consider upgrading your diagnostic equipment today.

Why I Stopped Overlooking Small Details in Auto Care
One of my biggest lightbulb moments was realizing that many chronic vehicle issues stem from simple, overlooked problems—like a slightly loose battery terminal or a clogged drain. Recognizing this shifted my perspective from reactive repairs to proactive maintenance, empowering me to catch problems before they escalate. So, I started checking my battery terminals regularly—it’s amazing how much a tiny routine can save you from unexpected breakdowns.
Tools and Resources That Changed My Repair Game
Investing in a quality digital multimeter, like the Fluke 115, was a game changer for diagnosing electrical issues accurately. I also rely on diagnostic software such as the Snap-on Verus Pro—it uncovers hidden problems that basic scanners miss. These tools have saved me countless hours and unnecessary parts replacement, proving that the right equipment is worth every penny.
Emotional Wisdom: Embrace the Complexity of Vehicle Maintenance
I’ve learned to accept that vehicle diagnostics involve layers of complexity. For example, a misfire could be caused by any number of factors—worn spark plugs, vacuum leaks, or faulty sensors. Patience and precise troubleshooting are essential. This mindset has helped me avoid hasty repairs and develop a deeper understanding of my vehicles, making me more confident and less prone to costly mistakes.
The Power of Routine Checks and Mindful Maintenance
Establishing a habit of regular inspections—like tightening battery terminals or checking fluid levels—prevents small problems from becoming emergencies. Even a quick check of your brake calipers or tire pressure can save you from roadside surprises. Consistency in maintenance arms you against unexpected breakdowns and extends your vehicle’s lifespan. Remember, a little proactive care now pays off in peace of mind later.
Final Thought: Your Auto Journey Starts Today
Taking control of your vehicle’s health with informed inspections and quality tools creates a safer, more reliable driving experience. Every step you take—whether tightening a terminal or investing in diagnostic gear—builds your confidence and ensures you’re prepared for whatever road throws your way. Embrace the learning process; your car is worth it. Are you ready to start your own auto repair journey and enjoy the benefits of smarter maintenance?
What’s one small step you’ll try today to improve your vehicle’s reliability? Share below—I love hearing your stories!