Ever been stranded because your car won’t start in the morning? That frustrating, sinking feeling of waking up to a dead battery, after thinking everything was fine just yesterday. I faced that exact moment last month, and let me tell you—it was a real lightbulb moment. I didn’t have fancy tools or a shop full of diagnostic equipment. All I had was a simple multimeter, and an urge to solve the mystery without wasting a fortune at the shop.
Discovering the Hidden Drain in My Battery
Like many, I thought my battery was just old or worn out. But after a quick check, I realized there was something more sinister lurking. Cars are complex beasts, with countless electrical components vying for power. When one of them refuses to turn off or draws power when it shouldn’t, it creates what we call a parasitic drain—constant power leakage that slowly kills your battery over days or weeks. Solving this could save you the headache of being stranded or constantly replacing batteries.
Is Using a Multimeter to Detect Battery Drain Actually Worth the Hype?
Back in the day, I was skeptical. I mean, can a simple multimeter really pinpoint the culprit? I made the mistake early on of jumping straight into disconnecting wires without understanding how much current was normal. That led me to false alarms and confusion. Now, I know better. Here’s a quick trick to find vacuum leaks—and similar principles apply: patience and understanding of what to expect are key. Using a multimeter to identify a parasitic drain is straightforward once you know how to read the numbers and where to look. Together, we’ll walk through how to do this step-by-step, even if you’re a complete beginner.
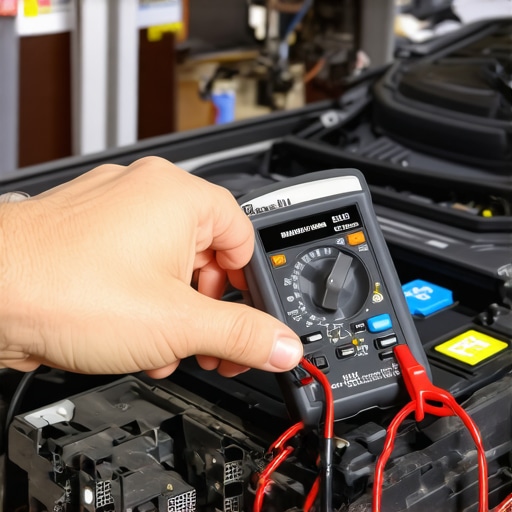
Set Up Your Multimeter Properly
Before diving into diagnostics, ensure your multimeter is capable of measuring high currents—usually in the milliamp range. Turn the multimeter to the amps setting, and if it has a separate port for high current, use it. For example, I once tried to measure current with my voltage setting—resulting in a blown fuse. Always double-check the multimeter’s specs and instructions to prevent mishaps.
Prepare Your Vehicle for Testing
Turn off all accessories, close all doors, and remove key from the ignition to prevent parasitic loads from turning on. Disconnect the negative terminal of your battery with a wrench—think of it as gently unplugging a device from a power strip to measure the draw without risking accidental starting. This step isolates your battery for more accurate testing.
Connect Your Multimeter Correctly
Attach the multimeter inline between the negative battery terminal and the cable. In other words, connect the red lead to the negative terminal and the black lead to the disconnected wire. This setup allows the multimeter to monitor current flow directly. Remember: safety first—wear gloves if necessary and ensure no metal tools contact other parts to avoid sparks.
Read and Interpret the Results
With everything connected, observe the display. A normal parasitic draw is around 20-50 milliamps—think of it as a small nightlight—anything significantly higher warrants investigation. For example, I once saw 200 milliamps and traced it to a faulty trunk light switch, which kept the circuit on overnight. Use this reading as a baseline for your vehicle’s normal consumption.
Pinpoint the Culprit Circuit
If the draw exceeds normal, start pulling fuses one at a time, noting how the current changes. This process is akin to systematically unplugging devices to find which one keeps your house light on. When you pull a fuse that results in a sharp decrease in current—say, from 300 milliamps down to 50—you’ve identified the circuit causing the drain. Swap or repair components on that circuit to resolve the issue.
For complex cases, consult your vehicle’s manual to identify circuits associated with the suspect fuse. For example, if pulling a fuse related to the interior lighting drops the current, check for faulty switches or wiring shorts in that area. This targeted approach saves time and money instead of replacing batteries prematurely.
Additional Tips to Consider
Always perform the test in a controlled environment, away from direct sunlight or extreme temperatures, which can affect battery performance. If your readings seem off, verify your multimeter’s accuracy by testing on a known load or using a second multimeter. Remember, patience is key—these steps can take time, but the results are worth it to avoid future roadside surprises.
By mastering these multimeter techniques, you gain a powerful tool to troubleshoot and save on costly repairs. Proper diagnosis prevents unnecessary part replacements and gives you confidence in tackling automotive electrical issues head-on. For more troubleshooting strategies, check out this quick vacuum leak test or fuel pump diagnostics.
Even seasoned car owners often fall for the myth that an oil change is just about swapping out dirty oil. But in reality, overlooking key nuances can lead to costly repairs down the line. Many believe that all oils are equally effective and that following the manufacturer’s mileage interval suffices, yet recent studies highlight the importance of oil type and driving conditions in extending engine life. For example, synthetic oils offer better high-temperature stability and oxidation resistance, crucial for modern turbocharged engines. Relying solely on mileage without considering your driving style—like frequent short trips—can cause premature engine wear. Moreover, a common misconception is that brand-name oils are always superior; however, over-specification and proper viscosity matter more. Failing to recognize these details may result in engine sludge, corrosion, or increased fuel consumption. When it comes to diagnostics, many assume that a check engine light always indicates a straightforward issue, but advanced problems—such as camshaft sensor failures—are harder to detect without a professional scan or familiarity with subtle symptoms. Delaying proper diagnosis could escalate minor issues into major failures. Think about brake service: replacing pads without inspecting the rotors and calipers can lead to uneven wear or vibrations. A typical mistake is ignoring the importance of brake fluid quality—cheap fluid or neglecting flushes can cause internal corrosion and reduced braking efficiency. Also, many overlook the significance of performing comprehensive system checks during repairs. For instance, misaligned steering components often persist unnoticed unless a proper wheel alignment is done after suspension work. This oversight can cause uneven tire wear and compromised safety, yet it’s a step many skip to save a few bucks. From my experience, the real kicker is improperly diagnosing a problem, such as misinterpreting a failing CV axle as a wheel balance issue, leading to unnecessary parts replacement. Advanced diagnostics require a keen eye, experience, and sometimes, specialized tools. Studies from the vehicle maintenance industry support this, indicating that misdiagnosis accounts for nearly 30% of unnecessary repairs. So, rather than just replacing parts, understanding the nuances—like testing for a blown head gasket with a simple balloon test or verifying a parasitic drain with a multimeter—can save time and money. Have you ever fallen into this trap? Let me know in the comments. Mastering these details transforms routine maintenance into savvy vehicle care, preventing surprises and ensuring longevity.
Investing in Reliable Equipment Makes the Difference
When it comes to keeping your vehicle in top shape, having the right tools is absolutely essential. I personally swear by a high-quality multimeter because it allows me to quickly identify electrical issues like parasitic drains or faulty wiring. Brands like Fluke offer models that withstand the rigors of automotive diagnostics, providing precise readings necessary for safe and efficient troubleshooting.
Beyond a multimeter, I rely on a professional-grade OBD-II scanner such as the Autel MaxiCOM. Unlike cheaper models, this device provides comprehensive code reading, live data streams, and even emissions testing. It helps me diagnose check engine lights accurately and is invaluable for pinpointing issues like failing sensors or misfires. Regularly updating the scanner’s software ensures compatibility with the latest vehicle models and diagnostic protocols.
Why Quality Matters in Diagnostic Tools
Using subpar equipment might save you money upfront but can lead to misdiagnosis or overlooked issues that turn into costly repairs later. For example, a reliable vacuum leak test, as explained here, is much easier with a good soap solution and proper visualization—something less effective with cheap tools. Precision and durability are key, especially when dealing with complex systems or stubborn problems like a slow leak or subtle misfire.
Keep Up with Long-Term Results
Maintaining your diagnostic arsenal isn’t just a one-time effort. Regular calibration and updates ensure your tools deliver consistent accuracy over years. It’s also wise to keep a detailed record of diagnostics and repairs. This habit can reveal patterns — like recurring sensor failures — thus helping you make better maintenance decisions and plan proactive repairs.
How do I maintain my diagnostic tools over time?
Proper storage in a padded case prevents damage, while periodically testing your devices with known good sources ensures they stay accurate. Following manufacturer calibration schedules and updating firmware or software confirms your equipment’s reliability, ensuring you’re always ready to address issues at the first sign of trouble. Advanced tools like thermal cameras or borescopes can extend your diagnostic capabilities into inspection and quick troubleshooting of hard-to-reach areas. For example, inspecting engine components with a borescope reveals problems that might otherwise require costly disassembly. Plus, investing in these specialized tools now can save you money in the long run by catching issues early — think of it as preventative health for your vehicle.
Future trends suggest a move toward integrated diagnostic solutions that connect via smartphones or tablets, offering real-time updates and AI-based problem prediction. Embracing these innovations can elevate your DIY skills and help you stay ahead of emerging automotive tech.
Ready to upgrade your toolkit? Consider adding a quality multimeter or a comprehensive OBD-II scanner to your garage. These investments not only empower you to troubleshoot effectively but can also speed up repairs and reduce dependence on costly mechanic visits. And if you’re interested in a quick and effective diagnostic move, try the quick vacuum leak test method—it’s a game-changer for identifying that sneaky source of engine performance issues.
Lessons from the Garage That Changed My Approach
- Never assume a battery is simply dead—always check for parasitic drains first; I learned this the hard way when replacing batteries every few months.
- Multimeters aren’t just for electricians—using one properly transformed my understanding of electrical issues, saving time and money on unnecessary part replacements.
- Reading fuses systematically revealed hidden circuit problems—something that’s easy to overlook but crucial for diagnosing complex issues rapidly.
- High-quality diagnostic tools make troubleshooting less intimidating; investing in reliable equipment like a well-rated OBD-II scanner has paid off immensely in my vehicles’ longevity.
- Patience and detailed notes during diagnostics help identify recurring problems; I now track issues over time to spot patterns before they escalate.
Tools and Resources I Hold Close for Auto Troubleshooting
- Fluke Multimeter: My go-to for accurate electrical readings; its durability and precision have prevented many misdiagnoses.
- Autel MaxiCOM Scanner: Enables me to access comprehensive vehicle data and interpret trouble codes confidently—worth every penny.
- This quick vacuum leak test: Simple, effective, and saves hours chasing elusive engine issues.
- Repair Guides and Forums: I trust dedicated automotive communities that share real-world solutions, often pointing out nuances that official manuals overlook.
Your Next Move in Car Care Begins Today
The secrets to effective automotive troubleshooting aren’t hidden—they’re within your reach if you’re willing to learn and invest in the right tools. Remember, every problem you solve with skill and patience extends your vehicle’s life and boosts your confidence as a car owner. Keep testing, keep learning, and don’t shy away from diving into your car’s mysteries—each step makes you more self-reliant and wiser on the road. Are you ready to take charge of your vehicle maintenance and troubleshooting skills? Share your experiences or questions below, and let’s grow together in automotive mastery!