One rainy Monday morning, I opened my hood and nearly gagged. Instead of the usual amber glow, my engine oil looked like a muddy chocolate milkshake. That unmistakable swirl of milky, frothy liquid was a lightbulb moment for me. I had just faced a problem many car owners dread—water contaminating the engine oil—and I knew I wasn’t alone. If you’ve ever checked your dipstick after a heavy rain and seen something similar, you understand the sinking feeling. It’s a sign that your car might be silently suffering from an internal water leak that can cause serious engine damage if left unaddressed.
The Mystery of Milky Oil: Water Gets Inside When You Least Expect It
Is Water in Your Oil Actually Contaminating Your Engine?
Early on, I made the mistake of dismissing this milky appearance as just a one-time thing or perhaps residual moisture after a wash. But I learned that water can sneak into your engine through various pathways, especially after heavy rain or car washes. When water mixes with engine oil, it creates that distinctive chocolate milk look, which isn’t just messy—it’s a warning sign of a more serious issue, such as a head gasket leak or a crack in the cylinder head. Ignoring this can lead to corrosion, sludge build-up, and ultimately, engine failure. In fact, water contamination is one of the most overlooked causes of engine damage, yet it’s surprisingly common in rainy climates. According to automotive experts, allowing water to persist in your engine oil accelerates wear and drastically reduces engine lifespan.
Now, I’m not here to scaremonger, but to help you understand what’s really going on beneath your hood. Have you ever noticed your oil looking strange after a storm, or do you suspect water might be lurking inside your engine? If so, don’t worry—we’ll explore how to diagnose and fix this problem step-by-step. By the time you finish reading, you’ll be equipped with practical knowledge, so next time rain hits, you won’t panic—you’ll know exactly what to do.
Prepping Your Workspace and Safety Gear
Start by parking your vehicle on a flat surface, engaging the parking brake, and turning off the engine. Wear gloves and safety glasses to protect against hot oil and debris. Gather necessary tools, including a wrench, a clean container for draining oil, and a clean rag. Having your owner’s manual handy helps identify the oil drain plug location and specifications.
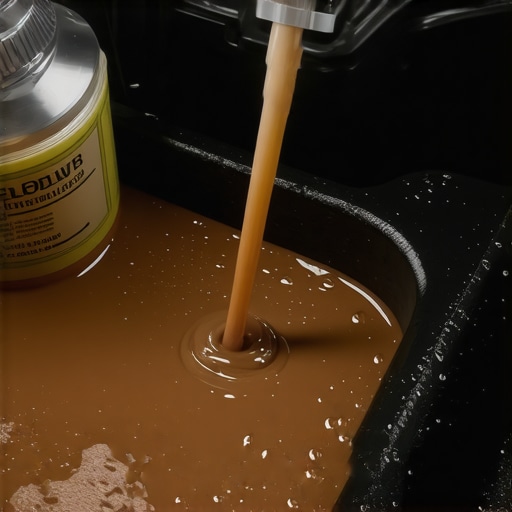
Checking the Oil Sample for Water
Pull out your dipstick after the engine has cooled down. Observe the oil’s color and consistency; milky or frothy oil indicates water contamination. For a more accurate diagnosis, drain a small amount of oil into a clean container to examine its appearance closely. Milky, white, or creamy oil confirms water intrusion, whereas clear, amber oil is normal. During my own experience, I found the milkshake-like oil surprisingly thick and bubbly, clearly signaling water presence. This step is crucial because it prevents unnecessary engine work if the water intrusion is minimal.
Locating the Source of Water Entry
Water can seep into your engine oil through cracked head gaskets, damaged valve cover gaskets, or water ingress from driving through deep puddles. Inspect the engine bay for leaks or cracks, especially around gasket areas. If you suspect a head gasket failure, look for other symptoms like white smoke from the exhaust or loss of compression. Sometimes, the water entry isn’t obvious, but recent heavy rains or car washes could be clues. If your vehicle has been exposed to moisture, check related seals and consider consulting a mechanic for a detailed diagnosis. For example, I discovered a small crack in the valve cover gasket that allowed water to seep in during intense storms, which I then sealed with a reputable gasket sealant.
Repairing the Water Entry Point
Based on the inspection, replace damaged gaskets using a high-quality, OEM-recommended part. Ensure the engine surface is clean and dry before installing the new gasket. For cracked components, such as the cylinder head, it’s advisable to seek professional assistance due to the complexity involved — a simple repair might involve removing the head for proper sealing. When I replaced a faulty valve cover gasket, I followed a step-by-step guide from a trusted resource, making sure all bolts were torqued to specification. This not only prevents future leaks but also ensures your oil remains free of water contaminants.
Flushing and Replacing the Contaminated Oil
Drain the entire engine oil along with the oil filter. Use a drain pan to catch the oil as it flows out. Once drained, remove the old filter and install a new one, ensuring the correct torque. Refill with fresh, high-quality engine oil recommended for your vehicle. During my own fix, I used synthetic oil to better resist moisture and prevent future water contamination. Running the engine for a few minutes allows the oil to circulate, further flushing out residual moisture. To double-check, you can repeat the oil inspection with a dipstick after a short drive to ensure the milky appearance is gone, preventing long-term engine damage. Remember, regularly monitoring your oil after heavy rain or car washes helps catch water ingress early, maintaining engine health and performance.Many vehicle owners believe they understand the basics of oil changes and diagnostics, but in reality, there are nuanced truths and common misconceptions that can cost you time and money. Contrary to popular belief, regularly changing your oil isn’t just about sticking to the manufacturer’s schedule; it’s about understanding the quality of the oil and the specific needs of your engine. Some drivers rely solely on the color of their oil to judge its condition, but as I explain in my article on [how to tell if your oil is bad](https://repairmycarpro.com/why-your-engine-misfires-only-when-it-rains), visual cues can be misleading. Advanced issues like water contamination or sludge buildup often require diagnostic tools beyond simple visual inspection, yet many neglect these crucial steps.
A common myth is that vehicle diagnostics are foolproof when performed with generic scanners. However, without a deep understanding of sensor behaviors and potential discrepancies, you might miss critical faults. Did you know that some sensors can fail silently, giving false readings? For instance, a failing oxygen sensor can cause incomplete combustion without triggering a check engine light immediately. Experts recommend employing more sophisticated diagnostic methods, like checking for parasitic drains using a multimeter, to avoid surprises on the road.
In auto repair, many assume that cheap parts save money and won’t impact performance. But installing fake OEM parts can lead to quicker wear or even severe engine damage. Before replacing a component, always verify its authenticity—check [how to spot a fake OEM part](https://repairmycarpro.com/how-to-spot-a-fake-oem-part-before-you-install-it). This extra step can prevent common pitfalls that often lead to expensive repairs down the line.
A trap I see many fall into is ignoring early signs of brake or suspension issues, believing they’re minor. However, overlooking subtle vibrations or noises—like those caused by uneven brake pad wear—can escalate into dangerous failures. For example, a slight wobble when braking could be a sign of warped rotors, which, if ignored, can ruin your entire braking system. Regular inspections and understanding what symptoms truly indicate can save you from costly replacements.
Bryan L. Jones, a seasoned automotive mechanic, emphasizes that ‘diagnostics should be both a science and an art.’ He highlights that many issues, especially those involving subtle sensor faults or wiring problems, require an analytical approach coupled with practical intuition. Relying solely on generic troubleshooting can lead to misdiagnosis—a costly mistake if not careful.
Have you ever fallen into this trap? Let me know in the comments. By digging deeper into these nuances and avoiding common pitfalls, you can make smarter decisions and keep your vehicle running smoothly longer. Remember, understanding your car’s subtle signals is key to preventing small problems from turning into major repairs.
Keeping Your Vehicle in Peak Condition with the Right Tools
One of the most effective ways to ensure your vehicle runs smoothly over the long haul is investing in quality diagnostic and maintenance tools. Personally, I rely heavily on an automotive scan tool like the BlueDriver Bluetooth Adapter. It pairs seamlessly with my smartphone, providing comprehensive OBD-II diagnostics, including live data streams and trouble code descriptions. This tool has saved me countless trips to the mechanic by helping me identify issues early, such as sensor failures or coolant leaks, before they escalate into costly repairs.
Beyond diagnostics, I emphasize the importance of a reliable torque wrench. When working on critical components like valve cover gaskets or wheel lug nuts, torque accuracy is paramount. I use a digital torque wrench with a preset feature, ensuring I apply the exact specifications recommended by manufacturers—such as 80 ft-lb for wheel lugs, as specified in the owner’s manual. Proper torque application not only improves safety but also prevents parts from becoming damaged due to over-tightening.
Another often-overlooked tool is a boroscope. This small, flexible camera allows me to peer into engine cylinders or behind inaccessible panels without dismantling entire assemblies. It’s particularly useful for spotting coolant leaks or rust buildup that could be precursors to failures, as highlighted in the maple syrup smell article. Such proactive inspections are becoming increasingly vital as my vehicle ages.
How do I maintain my tools for longevity?
Proper maintenance of your diagnostic and repair tools ensures they remain accurate and reliable. Keep electronic devices like scan tools away from moisture and extreme temperatures, and periodically update their firmware and software. For mechanical tools like torque wrenches, always recalibrate them after heavy use or if they fall—incorrect torque application can lead to misdiagnosis or damage. Storage in a dedicated toolbox helps prevent rust and accidental damage, prolonging their functional life.
Looking ahead, I believe automotive diagnostic equipment will evolve towards even smarter, wireless solutions, integrating real-time data sharing via 5G networks. This could revolutionize DIY diagnostics, making complex system faults accessible for everyday car owners.
What’s the secret to long-term vehicle health?
Fundamentally, consistent maintenance practices combined with the right tools create a resilient car that serves you reliably for years. Regularly checking systems with your scan tool, verifying that torque measurements are precise, and inspecting difficult-to-see areas with a boroscope will help spot issues early and avoid costly repairs. Why not start today by calibrating your torque wrench or updating your diagnostic software? These small steps can make a big difference in keeping your vehicle working as hard as you do.
The Hardest Lesson I Learned About Oil and Water Intrusion
One of the most eye-opening experiences in my auto repair journey was discovering water lurking in my engine oil. It taught me to pay close attention to subtle signs and to respect the complexity of vehicle systems. I realized that regular inspections and a keen eye for changes can prevent costly damage. An honest mistake I made early on was dismissing milky oil as harmless when, in reality, it was a red flag signaling deeper issues that needed immediate attention.
Tools and Techniques That Saved My Engine
Investing in a quality diagnostic scanner and a reliable torque wrench transformed the way I maintain my vehicle. These tools gave me the ability to catch water ingress early and to correctly tighten gaskets and bolts. I trust resources like checking OEM authenticity to ensure parts are genuine, further safeguarding my engine’s health. Proper tools are your best allies in keeping water out of your engine and in maintaining optimal performance.
Taking Action Before Small Leaks Lead to Big Breakdowns
Remember, the key is to act swiftly when you notice milky oil or suspect water entry. Proactive steps like replacing gaskets, performing flushes, and testing for leaks can save thousands. Don’t wait for symptoms to worsen; early intervention preserves your engine’s longevity and your peace of mind. Regularly checking and maintaining your vehicle with the right tools is an investment that pays off, turning potential crises into manageable repairs.